1 环境准备
前提:支持kvm
宿主机OS版本:
ztree@ubuntu2:~$ lsb_release -a
No LSB modules are available.
Distributor ID:	Ubuntu
Description:	Ubuntu 22.04.2 LTS
Release:	22.04
Codename:	jammy
1.1 安装软件依赖
sudo apt update
sudo apt-get install debootstrap
sudo apt install qemu-kvm
sudo apt-get install subversion
sudo apt-get install git
sudo apt-get install make
sudo apt-get install qemu
sudo apt install libssl-dev libelf-dev
sudo apt-get install flex bison libc6-dev libc6-dev-i386 linux-libc-dev linux-libc-dev:i386 libgmp3-dev libmpfr-dev libmpc-dev
sudo apt-get install g++
sudo apt-get install build-essential
sudo apt install gcc
sudo apt install openssh-server
因为我后面还要将syzkaller用于fuzz Android,所以还要安装交叉编译工具:
sudo apt install gcc-aarch64-linux-gnu

sudo apt install g++-aarch64-linux-gnu
1.2 安装golang环境
参考go官网:https://go.dev/doc/install
# 安装当前最新版
ztree@ubuntu2:~$ cd Downloads/
ztree@ubuntu2:~/Downloads$ proxychains4 wget https://go.dev/dl/go1.20.5.linux-amd64.tar.gz

# 解压到/usr/local/go
sudo rm -rf /usr/local/go && sudo tar -C /usr/local -xzf go1.20.5.linux-amd64.tar.gz

# 配置环境变量
sudo vim /etc/profile
# 写入
export PATH=$PATH:/usr/local/go/bin
# 使生效
source /etc/profile

# 检查是否安装成功
ztree@ubuntu2:~$ go version
go version go1.20.5 linux/amd64
1.3 设置golang工作目录
# 创建工作目录
ztree@ubuntu2:~/fuzz/kernel$ mkdir gopath

# 配置环境变量
ztree@ubuntu2:~/fuzz/kernel$ sudo vim /etc/profile
# 写入
export PATH=$PATH:/home/ztree/fuzz/kernel/gopath
# 使生效
ztree@ubuntu2:~/fuzz/kernel$ source /etc/profile
1.4 编译syzkaller
# 后续syzkaller的源码需要放在工作目录下的这个子目录下
ztree@ubuntu2:~/fuzz/kernel/gopath$ mkdir -p github.com/google

ztree@ubuntu2:~/fuzz/kernel/gopath$ cd github.com/google

ztree@ubuntu2:~/fuzz/kernel/gopath/github.com/google$ git clone https://github.com/google/syzkaller.git
# git clone https://gitclone.com/github.com/google/syzkaller.git

ztree@ubuntu2:~/fuzz/kernel/gopath/github.com/google$ cd syzkaller

# 编译linux-amd64架构的syzkaller
ztree@ubuntu2:~/fuzz/kernel/gopath/github.com/google/syzkaller$ make
go list -f '{{.Stale}}' ./sys/syz-sysgen | grep -q false || go install ./sys/syz-sysgen
make .descriptions
bin/syz-sysgen
touch .descriptions
GOOS=linux GOARCH=amd64 go build "-ldflags=-s -w -X github.com/google/syzkaller/prog.GitRevision=6a383ecfb767c80c9fa63c7708b25e568a4ebfec -X 'github.com/google/syzkaller/prog.gitRevisionDate=20210325-083211'" -o ./bin/syz-manager github.com/google/syzkaller/syz-manager
GOOS=linux GOARCH=amd64 go build "-ldflags=-s -w -X github.com/google/syzkaller/prog.GitRevision=6a383ecfb767c80c9fa63c7708b25e568a4ebfec -X 'github.com/google/syzkaller/prog.gitRevisionDate=20210325-083211'" -o ./bin/syz-runtest github.com/google/syzkaller/tools/syz-runtest
GOOS=linux GOARCH=amd64 go build "-ldflags=-s -w -X github.com/google/syzkaller/prog.GitRevision=6a383ecfb767c80c9fa63c7708b25e568a4ebfec -X 'github.com/google/syzkaller/prog.gitRevisionDate=20210325-083211'" -o ./bin/syz-repro github.com/google/syzkaller/tools/syz-repro
GOOS=linux GOARCH=amd64 go build "-ldflags=-s -w -X github.com/google/syzkaller/prog.GitRevision=6a383ecfb767c80c9fa63c7708b25e568a4ebfec -X 'github.com/google/syzkaller/prog.gitRevisionDate=20210325-083211'" -o ./bin/syz-mutate github.com/google/syzkaller/tools/syz-mutate
GOOS=linux GOARCH=amd64 go build "-ldflags=-s -w -X github.com/google/syzkaller/prog.GitRevision=6a383ecfb767c80c9fa63c7708b25e568a4ebfec -X 'github.com/google/syzkaller/prog.gitRevisionDate=20210325-083211'" -o ./bin/syz-prog2c github.com/google/syzkaller/tools/syz-prog2c
GOOS=linux GOARCH=amd64 go build "-ldflags=-s -w -X github.com/google/syzkaller/prog.GitRevision=6a383ecfb767c80c9fa63c7708b25e568a4ebfec -X 'github.com/google/syzkaller/prog.gitRevisionDate=20210325-083211'" -o ./bin/syz-db github.com/google/syzkaller/tools/syz-db
GOOS=linux GOARCH=amd64 go build "-ldflags=-s -w -X github.com/google/syzkaller/prog.GitRevision=6a383ecfb767c80c9fa63c7708b25e568a4ebfec -X 'github.com/google/syzkaller/prog.gitRevisionDate=20210325-083211'" -o ./bin/syz-upgrade github.com/google/syzkaller/tools/syz-upgrade
GOOS=linux GOARCH=amd64 go build "-ldflags=-s -w -X github.com/google/syzkaller/prog.GitRevision=6a383ecfb767c80c9fa63c7708b25e568a4ebfec -X 'github.com/google/syzkaller/prog.gitRevisionDate=20210325-083211'" "-tags=syz_target syz_os_linux syz_arch_amd64 " -o ./bin/linux_amd64/syz-fuzzer github.com/google/syzkaller/syz-fuzzer
GOOS=linux GOARCH=amd64 go build "-ldflags=-s -w -X github.com/google/syzkaller/prog.GitRevision=6a383ecfb767c80c9fa63c7708b25e568a4ebfec -X 'github.com/google/syzkaller/prog.gitRevisionDate=20210325-083211'" "-tags=syz_target syz_os_linux syz_arch_amd64 " -o ./bin/linux_amd64/syz-execprog github.com/google/syzkaller/tools/syz-execprog
GOOS=linux GOARCH=amd64 go build "-ldflags=-s -w -X github.com/google/syzkaller/prog.GitRevision=6a383ecfb767c80c9fa63c7708b25e568a4ebfec -X 'github.com/google/syzkaller/prog.gitRevisionDate=20210325-083211'" "-tags=syz_target syz_os_linux syz_arch_amd64 " -o ./bin/linux_amd64/syz-stress github.com/google/syzkaller/tools/syz-stress
mkdir -p ./bin/linux_amd64
gcc -o ./bin/linux_amd64/syz-executor executor/executor.cc \
	-m64 -O2 -pthread -Wall -Werror -Wparentheses -Wunused-const-variable -Wframe-larger-than=16384 -static  -DGOOS_linux=1 -DGOARCH_amd64=1 \
	-DHOSTGOOS_linux=1 -DGIT_REVISION=\"6a383ecfb767c80c9fa63c7708b25e568a4ebfec\"

# 查看编译结果
ztree@ubuntu2:~/fuzz/kernel/gopath/github.com/google/syzkaller$ ls bin
linux_amd64  syz-db  syz-manager  syz-mutate  syz-prog2c  syz-repro  syz-runtest  syz-sysgen  syz-upgrade

# bin/linux_amd64/是linux-amd64架构的一些二进制程序
ztree@ubuntu2:~/fuzz/kernel/gopath/github.com/google/syzkaller$ ls bin/linux_amd64/
syz-execprog  syz-executor  syz-fuzzer  syz-stress

# 编译linux-arm64架构的syzkaller(for Android)
ztree@ubuntu2:~/fuzz/kernel/gopath/github.com/google/syzkaller$ make TARGETOS=linux TARGETARCH=arm64
go list -f '{{.Stale}}' ./sys/syz-sysgen | grep -q false || go install ./sys/syz-sysgen
make .descriptions
make[1]: '.descriptions' is up to date.
GOOS=linux GOARCH=amd64 go build "-ldflags=-s -w -X github.com/google/syzkaller/prog.GitRevision=6a383ecfb767c80c9fa63c7708b25e568a4ebfec -X 'github.com/google/syzkaller/prog.gitRevisionDate=20210325-083211'" -o ./bin/syz-manager github.com/google/syzkaller/syz-manager
GOOS=linux GOARCH=amd64 go build "-ldflags=-s -w -X github.com/google/syzkaller/prog.GitRevision=6a383ecfb767c80c9fa63c7708b25e568a4ebfec -X 'github.com/google/syzkaller/prog.gitRevisionDate=20210325-083211'" -o ./bin/syz-runtest github.com/google/syzkaller/tools/syz-runtest
GOOS=linux GOARCH=amd64 go build "-ldflags=-s -w -X github.com/google/syzkaller/prog.GitRevision=6a383ecfb767c80c9fa63c7708b25e568a4ebfec -X 'github.com/google/syzkaller/prog.gitRevisionDate=20210325-083211'" -o ./bin/syz-repro github.com/google/syzkaller/tools/syz-repro
GOOS=linux GOARCH=amd64 go build "-ldflags=-s -w -X github.com/google/syzkaller/prog.GitRevision=6a383ecfb767c80c9fa63c7708b25e568a4ebfec -X 'github.com/google/syzkaller/prog.gitRevisionDate=20210325-083211'" -o ./bin/syz-mutate github.com/google/syzkaller/tools/syz-mutate
GOOS=linux GOARCH=amd64 go build "-ldflags=-s -w -X github.com/google/syzkaller/prog.GitRevision=6a383ecfb767c80c9fa63c7708b25e568a4ebfec -X 'github.com/google/syzkaller/prog.gitRevisionDate=20210325-083211'" -o ./bin/syz-prog2c github.com/google/syzkaller/tools/syz-prog2c
GOOS=linux GOARCH=amd64 go build "-ldflags=-s -w -X github.com/google/syzkaller/prog.GitRevision=6a383ecfb767c80c9fa63c7708b25e568a4ebfec -X 'github.com/google/syzkaller/prog.gitRevisionDate=20210325-083211'" -o ./bin/syz-db github.com/google/syzkaller/tools/syz-db
GOOS=linux GOARCH=amd64 go build "-ldflags=-s -w -X github.com/google/syzkaller/prog.GitRevision=6a383ecfb767c80c9fa63c7708b25e568a4ebfec -X 'github.com/google/syzkaller/prog.gitRevisionDate=20210325-083211'" -o ./bin/syz-upgrade github.com/google/syzkaller/tools/syz-upgrade
GOOS=linux GOARCH=arm64 go build "-ldflags=-s -w -X github.com/google/syzkaller/prog.GitRevision=6a383ecfb767c80c9fa63c7708b25e568a4ebfec -X 'github.com/google/syzkaller/prog.gitRevisionDate=20210325-083211'" "-tags=syz_target syz_os_linux syz_arch_arm64 " -o ./bin/linux_arm64/syz-fuzzer github.com/google/syzkaller/syz-fuzzer
GOOS=linux GOARCH=arm64 go build "-ldflags=-s -w -X github.com/google/syzkaller/prog.GitRevision=6a383ecfb767c80c9fa63c7708b25e568a4ebfec -X 'github.com/google/syzkaller/prog.gitRevisionDate=20210325-083211'" "-tags=syz_target syz_os_linux syz_arch_arm64 " -o ./bin/linux_arm64/syz-execprog github.com/google/syzkaller/tools/syz-execprog
GOOS=linux GOARCH=arm64 go build "-ldflags=-s -w -X github.com/google/syzkaller/prog.GitRevision=6a383ecfb767c80c9fa63c7708b25e568a4ebfec -X 'github.com/google/syzkaller/prog.gitRevisionDate=20210325-083211'" "-tags=syz_target syz_os_linux syz_arch_arm64 " -o ./bin/linux_arm64/syz-stress github.com/google/syzkaller/tools/syz-stress
mkdir -p ./bin/linux_arm64
aarch64-linux-gnu-gcc -o ./bin/linux_arm64/syz-executor executor/executor.cc \
	-O2 -pthread -Wall -Werror -Wparentheses -Wunused-const-variable -Wframe-larger-than=16384 -static  -DGOOS_linux=1 -DGOARCH_arm64=1 \
	-DHOSTGOOS_linux=1 -DGIT_REVISION=\"6a383ecfb767c80c9fa63c7708b25e568a4ebfec\"

# 编译结果
ztree@ubuntu2:~/fuzz/kernel/gopath/github.com/google/syzkaller$ ls bin
linux_amd64  linux_arm64  syz-db  syz-manager  syz-mutate  syz-prog2c  syz-repro  syz-runtest  syz-sysgen  syz-upgrade

ztree@ubuntu2:~/fuzz/kernel/gopath/github.com/google/syzkaller$ ls bin/linux_arm64/
syz-execprog  syz-executor  syz-fuzzer  syz-stress

# Android-32位
# make TARGETOS=linux TARGETARCH=arm
2 Linux Kernel - Amd64
2.1 拉取linux代码
ztree@ubuntu2:~/fuzz/kernel$ git clone https://mirrors.tuna.tsinghua.edu.cn/git/linux.git

ztree@ubuntu2:~/fuzz/kernel$ cd linux/
2.2 生成默认的内核配置文件
使用/usr/bin/gcc作为编译器,生成默认的内核配置文件(也称为defconfig),该配置文件包含了系统中已经支持的硬件设备和选项。
make CC="/usr/bin/gcc" defconfig
CC="/usr/bin/gcc"用于指定GCC编译器的路径。这是因为编译内核时需要使用编译器来生成可执行代码。通过指定GCC编译器的路径,可以确保使用特定的编译器进行编译。生成defconfig文件的主要目的是为了提供一个默认的配置文件
.config,方便用户快速开始使用。.config文件中包含了一组默认的配置选项,这些选项通常是在大多数情况下都适用的。在生成defconfig文件时,会根据一些常见的配置选项和硬件支持信息自动生成一个默认的配置文件。然后,用户可以根据自己的需要选择是否更改这些配置选项。
看一下执行效果:
# 执行前,没有.config文件
ztree@ubuntu2:~/fuzz/kernel/linux$ ls -a | grep config
.cocciconfig
Kconfig

# 执行,生成默认配置文件
ztree@ubuntu2:~/fuzz/kernel/linux$ make CC="/usr/bin/gcc" defconfig
  HOSTCC  scripts/basic/fixdep
  HOSTCC  scripts/kconfig/conf.o
  HOSTCC  scripts/kconfig/confdata.o
  HOSTCC  scripts/kconfig/expr.o
  LEX     scripts/kconfig/lexer.lex.c
  YACC    scripts/kconfig/parser.tab.[ch]
  HOSTCC  scripts/kconfig/lexer.lex.o
  HOSTCC  scripts/kconfig/menu.o
  HOSTCC  scripts/kconfig/parser.tab.o
  HOSTCC  scripts/kconfig/preprocess.o
  HOSTCC  scripts/kconfig/symbol.o
  HOSTCC  scripts/kconfig/util.o
  HOSTLD  scripts/kconfig/conf
*** Default configuration is based on 'x86_64_defconfig'
#
# configuration written to .config
#

# 执行后,有.config文件
ztree@ubuntu2:~/fuzz/kernel/linux$ ls -a | grep config
.cocciconfig
.config
Kconfig
2.3 基于默认配置文件合并kvm_guest.config
下面的输出很明显地说明了这条命令的作用,使用.config作为基础,合并kvm_guest.config文件,然后将结果写入.config作为最终的内核配置文件。kvm_guest.config是一种特殊的配置文件,用于构建适用于KVM虚拟机的内核。
ztree@ubuntu2:~/fuzz/kernel/linux$ make CC="/usr/bin/gcc" kvm_guest.config
Using .config as base
Merging ./kernel/configs/kvm_guest.config
#
# merged configuration written to .config (needs make)
#
#
# configuration written to .config
#
kvm_guest.config作为内核配置文件并不是所有情况下都适用的。它是专门为KVM虚拟化环境而设置的,包含了一些针对虚拟化的特定配置选项。这些选项可能与普通的物理机配置有所不同。通过合并使用配置文件
kvm_guest.config,可以确保内核在KVM环境中有更好的性能和兼容性。
2.4 修改配置文件.config
vim .config

### 在.config中添加以下内容:

# 启用内核代码覆盖率检测功能。通过在内核代码中插入特殊的探针来确定哪些代码路径已执行,以便测试覆盖率
CONFIG_KCOV=y         # must

# 启用内核调试信息。编译内核时将生成额外的调试信息,这些信息可用于调试内核问题
CONFIG_DEBUG_INFO=y

# Memory bug detector
# 启用KASAN,用于检测内核地址访问错误,可以检测越界访问、UAF等
CONFIG_KASAN=y
# 指定KASAN代码是否内联到内核中。将其设置为y可以使内核更小更快,但KASAN报告的堆栈跟踪可能不完整
CONFIG_KASAN_INLINE=y

# Code coverage works better when KASLR Is disabled
# CONFIG_RANDOMIZE_BASE is not set

# 可选
# 指定要覆盖的代码范围。设置为y时,将覆盖内核所有函数。否则,只覆盖具有适当注释的函数。
CONFIG_KCOV_INSTRUMENT_ALL=y
# 启用KCOV比较功能。当设置为y时,将记录if语句的结果是否为真。
CONFIG_KCOV_ENABLE_COMPARISONS=y
# 启用内核调试文件系统(debugfs)。它提供了一种向内核发送调试信息的机制,例如通过读写特定文件进行调试和监视。
CONFIG_DEBUG_FS=y
# 启用内核内存泄漏检测器(Kernel Memory Leak Detector)。它可以检测到内核中未释放的内存分配。
CONFIG_DEBUG_KMEMLEAK=y

# 需要配置以下两个,否则后面fuzz 启动的时候可能出现文件系统的挂载错误
# 启用Linux内核中的ConfigFS文件系统。ConfigFS是一个用于动态配置和调整Linux内核中各种配置项的文件系统,它允许用户通过文件系统接口来访问和修改内核中的配置信息。
CONFIG_CONFIGFS_FS=y
# 启用Linux内核中的SecurityFS文件系统。SecurityFS是一个用于安全模块管理的文件系统,它允许安全模块向用户空间提供安全策略、状态和控制信息。通过SecurityFS,安全模块可以将相关信息和接口暴露给用户空间进>行管理和配置。
CONFIG_SECURITYFS=y
2.5 确认修改后的.config和内核源代码树中的配置选项是匹配的
make oldconfig是Linux内核的一个Makefile目标命令,其作用是使用当前配置文件更新内核源代码树中的新配置选项。
当我们需要升级或更改内核版本时,新版本的内核可能会引入一些新的配置选项,这些配置选项在原有的配置文件中是不存在的。如果我们直接使用旧版本的配置文件去编译新版本的内核,编译过程中会报错,因为找不到这些新的配置选项。
make oldconfig的作用就是解决这个问题,它会使用当前配置文件中的配置选项去更新内核源代码树中的新配置选项,使得编译过程能够顺利进行。在更新过程中,会提示用户输入新配置选项的值,并将其添加到配置文件中。
总结来说,make oldconfig的作用就是将当前配置文件与新版本的内核源代码进行对比,并将新版本的配置选项添加到配置文件中,以保持配置文件的最新状态,使得编译过程能够成功进行。
ztree@ubuntu2:~/fuzz/kernel/linux$ make CC="/usr/bin/gcc" olddefconfig
.config:5179:warning: override: reassigning to symbol KCOV
.config:5185:warning: override: reassigning to symbol KASAN
.config:5189:warning: override: reassigning to symbol RANDOMIZE_BASE
.config:5194:warning: override: reassigning to symbol DEBUG_FS
.config:5196:warning: override: reassigning to symbol DEBUG_KMEMLEAK
.config:5199:warning: override: reassigning to symbol CONFIGFS_FS
.config:5201:warning: override: reassigning to symbol SECURITYFS
#
# configuration written to .config
#
上面执行的结果中有一些warning,这些warning是无关紧要的。出现的原因是.config中,这些配置选项本来是用注释表示其未设置,比如:
# CONFIG_KCOV is not set
然后步骤2.4修改的时候,我是直接将新的配置拷贝到文件末尾。当执行完make oldconfig后,删掉了这些注释,并将新增的配置选项移动到了之前相应的注释那里。因为.config里所有配置选项是分块存放的,这样会方便查看。
#
# Kernel Testing and Coverage
#
# CONFIG_KUNIT is not set
......
CONFIG_KCOV=y
当然,如果你将新配置放在.config的开头,那么需要将原来相应的注释给删掉,否则新配置不会生效,因为被后面相应的注释给rewrite了。
2.6 开始编译Linux内核
ztree@ubuntu2:~/fuzz/kernel/linux$ make CC="/usr/bin/gcc" -j16
......
  BUILD   arch/x86/boot/bzImage
Kernel: arch/x86/boot/bzImage is ready  (#1)
2.7 构建文件系统镜像
下载sh脚本:create-image.sh,该脚本会借助 debootstrap 构建文件系统镜像。而debootstrap在1.1安装软件依赖的时候已经安装好了。
# 下载脚本
ztree@ubuntu2:~/fuzz/kernel/linux/image$ wget https://raw.githubusercontent.com/google/syzkaller/master/tools/create-image.sh -O create-image.sh
--2023-06-30 00:57:05--  https://raw.githubusercontent.com/google/syzkaller/master/tools/create-image.sh
Resolving raw.githubusercontent.com (raw.githubusercontent.com)... 0.0.0.0, ::
Connecting to raw.githubusercontent.com (raw.githubusercontent.com)|0.0.0.0|:443... failed: Connection refused.
Connecting to raw.githubusercontent.com (raw.githubusercontent.com)|::|:443... failed: Connection refused.

# 下载失败,进网页拷贝内容到create-image.sh

# 修改权限
ztree@ubuntu2:~/fuzz/kernel/linux/image$ chmod +x create-image.sh

# 构建文件系统镜像
ztree@ubuntu2:~/fuzz/kernel/linux/image$ ./create-image.sh
......
Allocating group tables: done
Writing inode tables: done
Creating journal (16384 blocks): done
Writing superblocks and filesystem accounting information: done

+ sudo mkdir -p /mnt/chroot
+ sudo mount -o loop bullseye.img /mnt/chroot
+ sudo cp -a chroot/. /mnt/chroot/.
+ sudo umount /mnt/chroot

# 查看构建结果
ztree@ubuntu2:~/fuzz/kernel/linux/image$ ls
bullseye.id_rsa  bullseye.id_rsa.pub  bullseye.img  chroot  create-image.sh
debootstrap是一个基于Debian的工具,用于从已有的Debian系统中创建一个基本的Debian系统环境。它用于在一个新的、空的文件系统上进行安装,可以用于创建一个完整的Debian环境,或者用于创建chroot环境。debootstrap是Debian Installer的一个组件,可以通过命令行进行操作,并根据指定的参数下载并安装Debian软件包。它提供了一个简单的方法来创建一个简洁、最小的Debian系统,以及一个可定制的环境。可以通过debootstrap来创建不同版本的Debian系统,包括stable、testing、unstable等。
2.8 运行syzkaller
# 创建一个工作目录
ztree@ubuntu2:~/fuzz/kernel$ mkdir syzkaller-workdir
下面介绍两种运行syzkaller的方法:
2.8.1 isolated模式
isolated模式需要先启动 qemu,然后再连过去。启动qemu的命令如下:
qemu-system-x86_64 \
 -kernel /home/ztree/fuzz/kernel/linux/arch/x86/boot/bzImage \
 -append "console=ttyS0 root=/dev/sda debug earlyprintk=serial slub_debug=QUZ"\
 -hda /home/ztree/fuzz/kernel/linux/image/bullseye.img \
 -net user,hostfwd=tcp::10021-:22 -net nic   \
 -enable-kvm \
 -nographic \
 -m 2560M \
 -smp 2 \
 -pidfile vm.pid \
 2>&1 | tee vm.log
有一个Error:
[FAILED] Failed to start Raise network interfaces.
See 'systemctl status networking.service' for details.
参考:https://github.com/google/syzkaller/blob/master/docs/linux/troubleshooting.md
解决办法有两个:
- 将以下两行添加到Kernel的配置文件
.config中,重新编译Linux内核
CONFIG_CMDLINE_BOOL=y
CONFIG_CMDLINE="net.ifnames=0"
- 当用qemu模式的时候,在syzkaller manager的配置文件中,在VM的属性里添加以下一行,具体的例子见下一小节。
"cmdline": "net.ifnames=0"
再次运行,nice,没报Error了,最后显示:
......
Debian GNU/Linux 11 syzkaller ttyS0

syzkaller login:
输入root,显示:
Debian GNU/Linux 11 syzkaller ttyS0

syzkaller login: root
Linux syzkaller 6.4.0-04247-g3a8a670eeeaa #2 SMP PREEMPT_DYNAMIC Sat Jul  1 23:58:09 CST 2023 x86_64

The programs included with the Debian GNU/Linux system are free software;
the exact distribution terms for each program are described in the
individual files in /usr/share/doc/*/copyright.

Debian GNU/Linux comes with ABSOLUTELY NO WARRANTY, to the extent
permitted by applicable law.
A valid context for root could not be obtained.
Last login: Sat Jul  1 14:48:25 UTC 2023 on ttyS0
root@syzkaller:~#
另开一个窗口,宿主机ssh连接
ztree@ubuntu2:~$ ssh -i /home/lzx/fuzz/kernel/linux/image/bullseye.id_rsa -p 10021 -o "StrictHostKeyChecking no" root@syzkaller
连接成功:
ztree@ubuntu2:~$ ssh -i ~/fuzz/kernel/linux/image/bullseye.id_rsa  -p 10021 -o "StrictHostKeyChecking no" root@localhost
Warning: Permanently added '[localhost]:10021' (ED25519) to the list of known hosts.
Linux syzkaller 6.4.0-04247-g3a8a670eeeaa #2 SMP PREEMPT_DYNAMIC Sat Jul  1 23:58:09 CST 2023 x86_64

The programs included with the Debian GNU/Linux system are free software;
the exact distribution terms for each program are described in the
individual files in /usr/share/doc/*/copyright.

Debian GNU/Linux comes with ABSOLUTELY NO WARRANTY, to the extent
permitted by applicable law.
A valid context for root could not be obtained.
Last login: Sat Jul  1 16:00:24 2023
root@syzkaller:~# ls
root@syzkaller:~# id
uid=0(root) gid=0(root) groups=0(root) context=system_u:system_r:kernel_t:s0
如果显示宿主机ssh连接不上虚拟机,则需要在
/etc/hosts.allow中加上一句sshd: ALL
关虚拟机:虚拟机内执行命令
poweroff,或者宿主机执行命令kill $(cat vm.pid)
给vm建立一个工作目录
ztree@ubuntu2:~/fuzz/kernel$ mkdir vm-workdir
接着,编写syzkaller manager的配置文件:
ztree@ubuntu2:~/fuzz/kernel/syzkaller-workdir$ vim test-isolated.cfg
{
        "target": "linux/amd64",
        "http": "127.0.0.1:56741",
        "rpc": "127.0.0.1:0",
        "workdir": "/home/ztree/fuzz/kernel/syzkaller-workdir",
        "kernel_obj": "/home/ztree/fuzz/kernel/linux",
        "image": "/home/ztree/fuzz/kernel/linux/image/bullseye.img",
        "sshkey": "/home/ztree/fuzz/kernel/linux/image/bullseye.id_rsa",
        "syzkaller": "/home/ztree/fuzz/kernel/gopath/github.com/google/syzkaller",
        "sandbox": "setuid",
        "procs": 8,
        "type": "isolated",
        "vm": {
                "targets" : [ "127.0.0.1:10021" ],
                "pstore": false,
          		  "target_dir" : "/home/ztree/fuzz/kernel/vm-workdir",
    		        "target_reboot" : false
        }
}
vm的属性target_dir代表虚拟机的工作目录。该目录用于存储各种与虚拟机相关的文件,例如内核映像、内核配置文件、文件系统映像等。
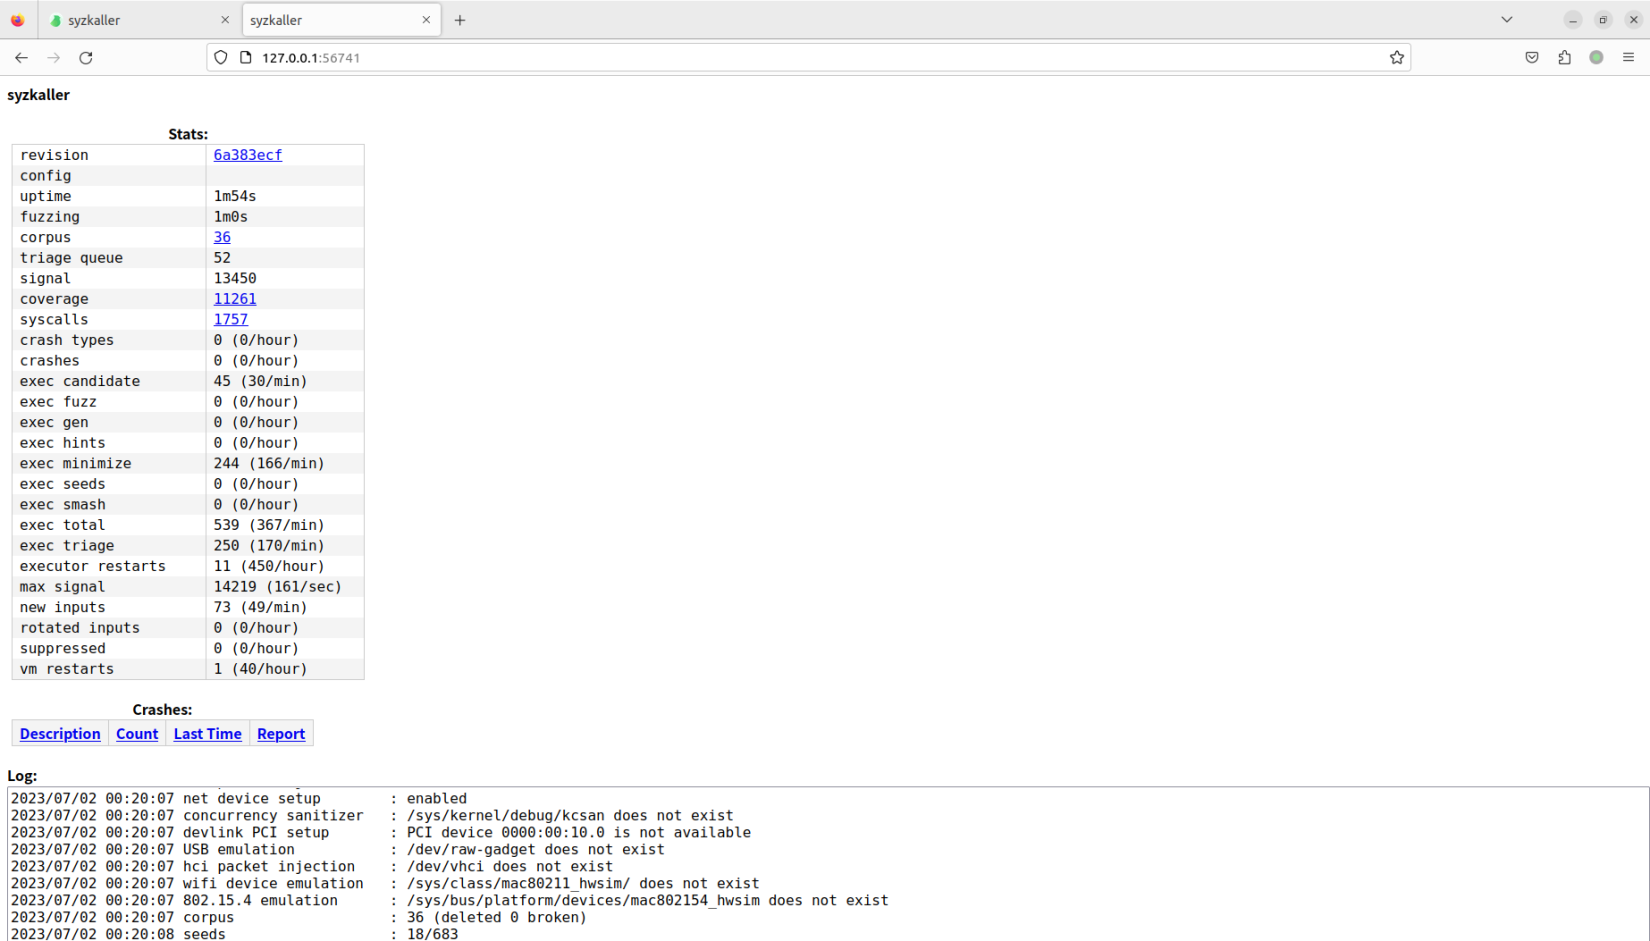
运行成功:
ztree@ubuntu2:~/fuzz/kernel/gopath/github.com/google/syzkaller/bin$ ./syz-manager -config=/home/ztree/fuzz/kernel/syzkaller-workdir/test-isolated.cfg
2023/07/02 00:19:41 loading corpus...
2023/07/02 00:19:41 serving http on http://127.0.0.1:56741
2023/07/02 00:19:41 serving rpc on tcp://127.0.0.1:40457
2023/07/02 00:19:41 booting test machines...
2023/07/02 00:19:41 wait for the connection from test machine...

2023/07/02 00:20:07 machine check:
2023/07/02 00:20:07 syscalls                : 1757/4124
2023/07/02 00:20:07 code coverage           : enabled
2023/07/02 00:20:07 comparison tracing      : enabled
2023/07/02 00:20:07 extra coverage          : enabled
2023/07/02 00:20:07 setuid sandbox          : enabled
2023/07/02 00:20:07 namespace sandbox       : /proc/self/ns/user does not exist
2023/07/02 00:20:07 Android sandbox         : enabled
2023/07/02 00:20:07 fault injection         : CONFIG_FAULT_INJECTION is not enabled
2023/07/02 00:20:07 leak checking           : enabled
2023/07/02 00:20:07 net packet injection    : /dev/net/tun does not exist
2023/07/02 00:20:07 net device setup        : enabled
2023/07/02 00:20:07 concurrency sanitizer   : /sys/kernel/debug/kcsan does not exist
2023/07/02 00:20:07 devlink PCI setup       : PCI device 0000:00:10.0 is not available
2023/07/02 00:20:07 USB emulation           : /dev/raw-gadget does not exist
2023/07/02 00:20:07 hci packet injection    : /dev/vhci does not exist
2023/07/02 00:20:07 wifi device emulation   : /sys/class/mac80211_hwsim/ does not exist
2023/07/02 00:20:07 802.15.4 emulation      : /sys/bus/platform/devices/mac802154_hwsim does not exist
2023/07/02 00:20:07 corpus                  : 36 (deleted 0 broken)
2023/07/02 00:20:08 seeds                   : 18/683
2023/07/02 00:20:11 VMs 1, executed 2, cover 0, signal 0/0, crashes 0, repro 0
2023/07/02 00:20:21 VMs 1, executed 8, cover 0, signal 0/0, crashes 0, repro 0
2023/07/02 00:20:31 VMs 1, executed 450, cover 11255, signal 13405/13916, crashes 0, repro 0
2023/07/02 00:20:41 VMs 1, executed 489, cover 11261, signal 13450/14022, crashes 0, repro 0
2023/07/02 00:20:51 VMs 1, executed 520, cover 11261, signal 13450/14065, crashes 0, repro 0
2.8.2 qemu模式
这种模式不需要先启动qemu,创建好配置文件后,直接执行syz-manager就ok了。在工作目录下创建一个syzkaller的配置文件:
{
        "target": "linux/amd64",
        "http": "127.0.0.1:56741",
        "workdir": "/home/ztree/fuzz/kernel/syzkaller-workdir",
        "kernel_obj": "/home/ztree/fuzz/kernel/linux",
        "image": "/home/ztree/fuzz/kernel/linux/image/bullseye.img",
        "sshkey": "/home/ztree/fuzz/kernel/linux/image/bullseye.id_rsa",
        "syzkaller": "/home/ztree/fuzz/kernel/gopath/github.com/google/syzkaller",
        "procs": 8,
        "type": "qemu",
        "enable_syscalls": [
            "open$proc",
            "read$proc",
            "write$proc",
            "close$proc"
        ],
        "vm": {
                "count": 4,
                "kernel": "/home/ztree/fuzz/kernel/linux/arch/x86/boot/bzImage",
                "cpu": 2,
                "mem": 2048,
                "cmdline": "net.ifnames=0",
		            "qemu_args":"-enable-kvm"
        }
}
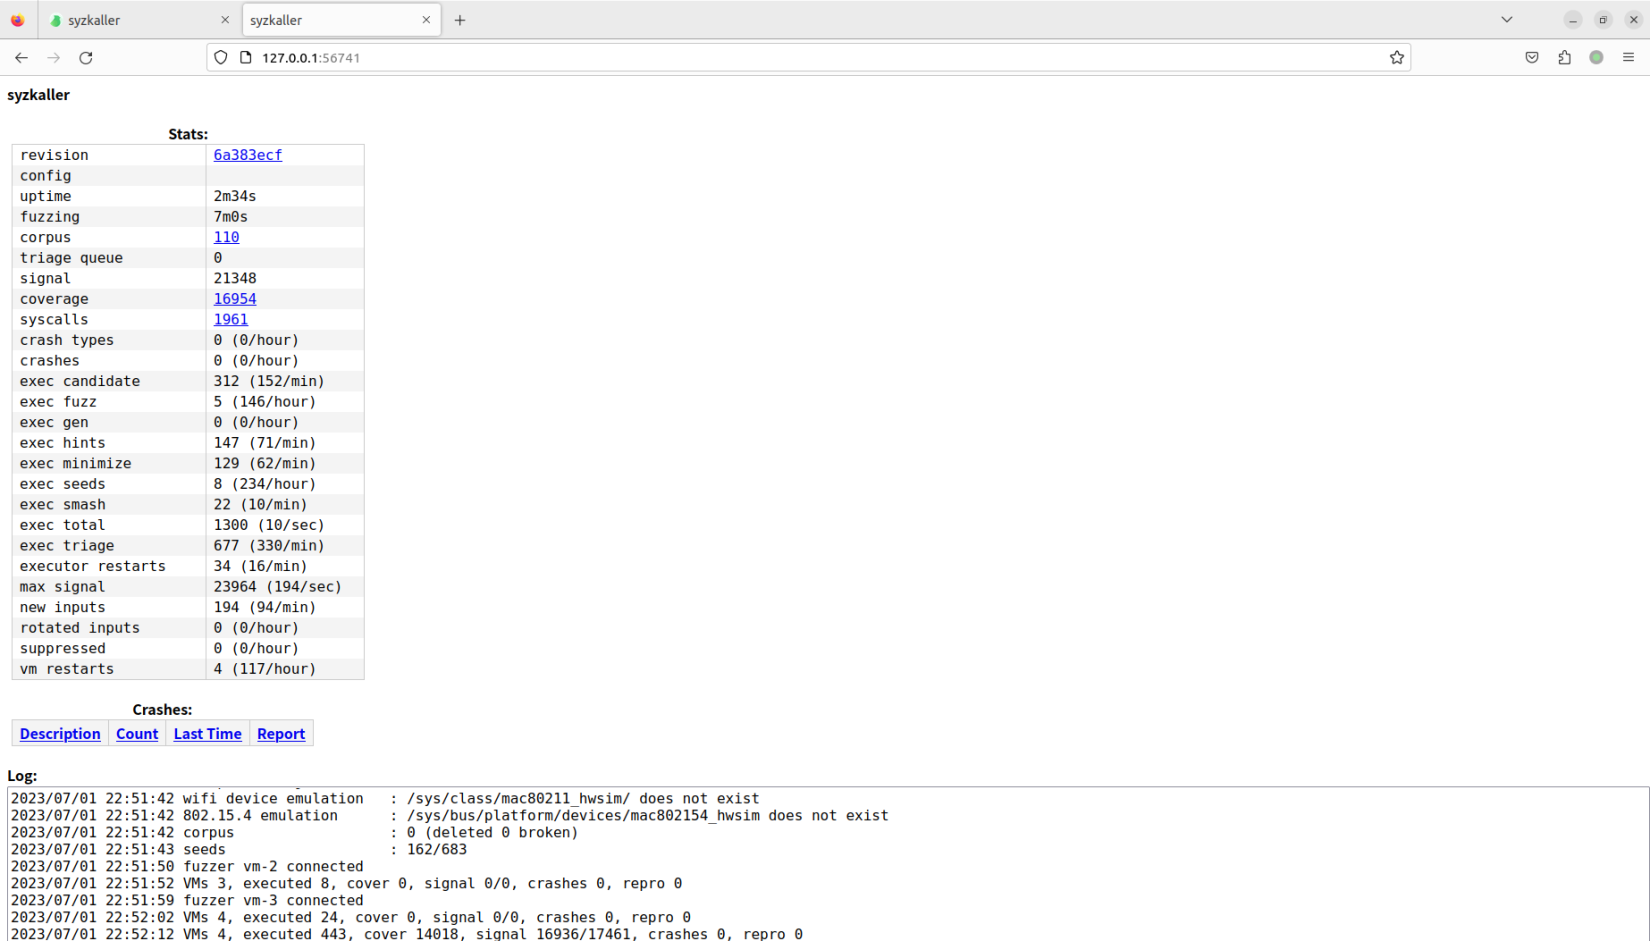
接着运行syzkaller:
ztree@ubuntu2:~/fuzz/kernel/gopath/github.com/google/syzkaller/bin$ ./syz-manager -config=/home/ztree/fuzz/kernel/syzkaller-workdir/test.cfg
2023/07/01 22:51:12 loading corpus...
2023/07/01 22:51:12 serving http on http://127.0.0.1:56741
2023/07/01 22:51:12 serving rpc on tcp://[::]:40619
2023/07/01 22:51:12 booting test machines...
2023/07/01 22:51:12 wait for the connection from test machine...
2023/07/01 22:51:42 machine check:
2023/07/01 22:51:42 syscalls                : 1961/4124
2023/07/01 22:51:42 code coverage           : enabled
2023/07/01 22:51:42 comparison tracing      : enabled
2023/07/01 22:51:42 extra coverage          : enabled
2023/07/01 22:51:42 setuid sandbox          : enabled
2023/07/01 22:51:42 namespace sandbox       : /proc/self/ns/user does not exist
2023/07/01 22:51:42 Android sandbox         : enabled
2023/07/01 22:51:42 fault injection         : CONFIG_FAULT_INJECTION is not enabled
2023/07/01 22:51:42 leak checking           : enabled
2023/07/01 22:51:42 net packet injection    : /dev/net/tun does not exist
2023/07/01 22:51:42 net device setup        : enabled
2023/07/01 22:51:42 concurrency sanitizer   : /sys/kernel/debug/kcsan does not exist
2023/07/01 22:51:42 devlink PCI setup       : PCI device 0000:00:10.0 is not available
2023/07/01 22:51:42 USB emulation           : /dev/raw-gadget does not exist
2023/07/01 22:51:42 hci packet injection    : /dev/vhci does not exist
2023/07/01 22:51:42 wifi device emulation   : /sys/class/mac80211_hwsim/ does not exist
2023/07/01 22:51:42 802.15.4 emulation      : /sys/bus/platform/devices/mac802154_hwsim does not exist
2023/07/01 22:51:42 corpus                  : 0 (deleted 0 broken)
2023/07/01 22:51:43 seeds                   : 162/683
2023/07/01 22:51:52 VMs 3, executed 8, cover 0, signal 0/0, crashes 0, repro 0
2023/07/01 22:52:02 VMs 4, executed 24, cover 0, signal 0/0, crashes 0, repro 0
2023/07/01 22:52:12 VMs 4, executed 443, cover 14018, signal 16936/17461, crashes 0, repro 0
2023/07/01 22:52:22 VMs 4, executed 866, cover 16119, signal 20305/20423, crashes 0, repro 0
2023/07/01 22:52:32 VMs 4, executed 890, cover 16232, signal 20354/20558, crashes 0, repro 0
2023/07/01 22:52:42 VMs 4, executed 923, cover 16233, signal 20486/22089, crashes 0, repro 0
2023/07/01 22:52:52 VMs 4, executed 972, cover 16233, signal 20489/22476, crashes 0, repro 0
2023/07/01 22:53:02 VMs 4, executed 1032, cover 16264, signal 20529/23384, crashes 0, repro 0
2023/07/01 22:53:12 VMs 4, executed 1083, cover 16264, signal 20529/23471, crashes 0, repro 0
2023/07/01 22:53:22 VMs 4, executed 1176, cover 16264, signal 20543/23767, crashes 0, repro 0
2023/07/01 22:53:32 VMs 4, executed 1193, cover 16350, signal 20653/23875, crashes 0, repro 0
2023/07/01 22:53:42 VMs 4, executed 1282, cover 16948, signal 21334/23911, crashes 0, repro 0
2023/07/01 22:53:52 VMs 4, executed 1327, cover 16963, signal 21362/23972, crashes 0, repro 0
2023/07/01 22:54:02 VMs 4, executed 1387, cover 16965, signal 21390/24070, crashes 0, repro 0
2023/07/01 22:54:12 VMs 4, executed 1431, cover 16987, signal 21437/24098, crashes 0, repro 0
然后浏览器输入http://127.0.0.1:56741就可以访问syz-manager了:
2.9 例子 - fuzz驱动
2.9.1 编译一个带漏洞的驱动
参考这两篇文章:
https://github.com/hardenedlinux/Debian-GNU-Linux-Profiles/blob/master/docs/harbian_qa/fuzz_testing/test.c
https://bbs.kanxue.com/thread-265405.htm#msg_header_h1_5
因为之前下载的是master分支,所以先看看这是啥版本:
ztree@ubuntu2:~/fuzz/kernel/linux$ git describe --tags
v6.4-4247-g3a8a670eeeaa
ztree@ubuntu2:~/fuzz/kernel/linux$ make kernelversion
6.4.0
准备编译环境,编译需要头文件的支持:
ztree@ubuntu2:~/fuzz/kernel/test$ mkdir 6.4.0
ztree@ubuntu2:~/fuzz/kernel/test$ cd 6.4.0/
ztree@ubuntu2:~/fuzz/kernel/test/6.4.0$ mkdir kernel
ztree@ubuntu2:~/fuzz/kernel/test/6.4.0$ ln -s /home/ztree/fuzz/kernel/linux ./source
ztree@ubuntu2:~/fuzz/kernel/test/6.4.0$ ln -s /home/ztree/fuzz/kernel/linux ./build
ztree@ubuntu2:~/fuzz/kernel/test/6.4.0$ ll
total 12
drwxrwxr-x 3 ztree ztree 4096  7月  3 23:19 ./
drwxrwxr-x 3 ztree ztree 4096  7月  3 23:16 ../
lrwxrwxrwx 1 ztree ztree   29  7月  3 23:19 build -> /home/ztree/fuzz/kernel/linux/
drwxrwxr-x 2 ztree ztree 4096  7月  3 23:16 kernel/
lrwxrwxrwx 1 ztree ztree   29  7月  3 23:19 source -> /home/ztree/fuzz/kernel/linux/
然后创建含有漏洞的代码文件:
ztree@ubuntu2:~/fuzz/kernel$ mkdir test
ztree@ubuntu2:~/fuzz/kernel$ cd test
ztree@ubuntu2:~/fuzz/kernel/test$ vim test.c
ztree@ubuntu2:~/fuzz/kernel/test$ vim Makefile
test.c如下:
#include <linux/init.h>
#include <linux/module.h>
#include <linux/proc_fs.h>
#include <linux/uaccess.h>
#include <linux/slab.h>

#define MY_DEV_NAME "test"
#define DEBUG_FLAG "PROC_DEV"

static ssize_t proc_read (struct file *proc_file, char __user *proc_user, size_t n, loff_t *loff);
static ssize_t proc_write (struct file *proc_file, const char __user *proc_user, size_t n, loff_t *loff);
static int proc_open (struct inode *proc_inode, struct file *proc_file);
static struct file_operations a = {
                                .open = proc_open,
                                .read = proc_read,
                                .write = proc_write,
};


static int __init mod_init(void)
{
    struct proc_dir_entry *test_entry;
    const struct file_operations *proc_fops = &a;
    printk(DEBUG_FLAG":proc init start!\n");

    test_entry = proc_create(MY_DEV_NAME, S_IRUGO|S_IWUGO, NULL, proc_fops);
    if(!test_entry)
       printk(DEBUG_FLAG":there is somethings wrong!\n");

    printk(DEBUG_FLAG":proc init over!\n");
    return 0;
}

static ssize_t proc_read (struct file *proc_file, char __user *proc_user, size_t n, loff_t *loff)
{
    printk(DEBUG_FLAG":finish copy_from_use,the string of newbuf is");

    return 0;
}

static ssize_t proc_write (struct file *proc_file, const char __user *proc_user, size_t n, loff_t *loff)
{
    char *c = kmalloc(512, GFP_KERNEL);

    copy_from_user(c, proc_user, 4096); // 很明显的堆溢出
    printk(DEBUG_FLAG":into write!\n");
    return 0;
}

int proc_open (struct inode *proc_inode, struct file *proc_file)
{
    printk(DEBUG_FLAG":into open!\n");
    return 0;
}

module_init(mod_init);
Makefile如下:
# Linux内核配置选项,用于启用或禁用内核模块的数字签名验证功能。当配置为y时,表示启用数字签名验证;当配置为n时,表示禁用数字签名验证。数字签名验证可以验证加载的内核模块是否经过数字签名认证,以确保模块的完整性和安全性。启用数字签名验证可以增强系统的安全性,防止恶意或未经授权的模块加载到内核中。
CONFIG_MODULE_SIG=n

obj-m += test.o

EXTRA_CFLAGS += -fno-stack-protector -no-pie
all:
	make -C /home/ztree/fuzz/kernel/test/6.4.0/build M=$(PWD) modules
clean:
	rm -rf *.ko
	rm -rf *.mod
	rm -rf *.mod.*
	rm -rf *.o
	rm .tmp_versions/test.mod
	rm .test.ko.cmd
	rm .test.mod.o.cmd
	rm .test.o.cmd
	rm Module.symvers
	rm modules.order
注意:Makefile中使用Tab作为前导空白字符,而不是空格。否则会报错:
*** missing separator. Stop
ztree@ubuntu2:~/fuzz/kernel/test$ make
make -C /home/ztree/fuzz/kernel/test/6.4.0/build M=/home/ztree/fuzz/kernel/test modules
make[1]: Entering directory '/home/ztree/fuzz/kernel/linux'
  CC [M]  /home/ztree/fuzz/kernel/test/test.o
/home/ztree/fuzz/kernel/test/test.c: In function ‘mod_init’:
/home/ztree/fuzz/kernel/test/test.c:26:66: error: passing argument 4 of ‘proc_create’ from incompatible pointer type [-Werror=incompatible-pointer-types]
   26 |     test_entry = proc_create(MY_DEV_NAME, S_IRUGO|S_IWUGO, NULL, proc_fops);
      |                                                                  ^~~~~~~~~
      |                                                                  |
      |                                                                  const struct file_operations *
In file included from /home/ztree/fuzz/kernel/test/test.c:3:
./include/linux/proc_fs.h:110:122: note: expected ‘const struct proc_ops *’ but argument is of type ‘const struct file_operations *’
  110 | struct proc_dir_entry *proc_create(const char *name, umode_t mode, struct proc_dir_entry *parent, const struct proc_ops *proc_ops);
      |                                                                                                   ~~~~~~~~~~~~~~~~~~~~~~~^~~~~~~~
/home/ztree/fuzz/kernel/test/test.c: In function ‘proc_write’:
/home/ztree/fuzz/kernel/test/test.c:45:5: error: ignoring return value of ‘copy_from_user’ declared with attribute ‘warn_unused_result’ [-Werror=unused-result]
   45 |     copy_from_user(c, proc_user, 4096);
      |     ^~~~~~~~~~~~~~~~~~~~~~~~~~~~~~~~~~
In file included from ./arch/x86/include/asm/preempt.h:9,
                 from ./include/linux/preempt.h:78,
                 from ./include/linux/spinlock.h:56,
                 from ./include/linux/kref.h:16,
                 from ./include/linux/mm_types.h:8,
                 from ./include/linux/buildid.h:5,
                 from ./include/linux/module.h:14,
                 from /home/ztree/fuzz/kernel/test/test.c:2:
In function ‘check_copy_size’,
    inlined from ‘copy_from_user’ at ./include/linux/uaccess.h:182:6,
    inlined from ‘proc_write’ at /home/ztree/fuzz/kernel/test/test.c:45:5:
./include/linux/thread_info.h:246:25: error: call to ‘__bad_copy_to’ declared with attribute error: copy destination size is too small
  246 |                         __bad_copy_to();
      |                         ^~~~~~~~~~~~~~~
cc1: all warnings being treated as errors
make[2]: *** [scripts/Makefile.build:252: /home/ztree/fuzz/kernel/test/test.o] Error 1
make[1]: *** [Makefile:2032: /home/ztree/fuzz/kernel/test] Error 2
make[1]: Leaving directory '/home/ztree/fuzz/kernel/linux'
make: *** [Makefile:8: all] Error 2
执行make 后,报错如上。
- 第一个报错:
proc_create的最后一个参数要求是const struct proc_ops *而不是旧的const struct file_operations *。 - 第二个报错:原因是代码中使用了
copy_from_user函数,并且默认将其声明为具有warn_unused_result属性。这个属性表示编译器会在发现函数返回值没有被使用时产生一个警告。- 所以为了解决这个错误,我们可以获取其返回值进行检查,但更方便的方法是在编译时加入
-Wno-error=unused-result参数,该参数告诉编译器将unused-result警告转换为普通的警告,而不是将其视为错误。
- 所以为了解决这个错误,我们可以获取其返回值进行检查,但更方便的方法是在编译时加入
- 第三个报错:编译运行时会检查
copy_from_user的参数,检测到了4096明显比destination buffer更大,会发生溢出。hmmm,为什么网上其他的文章都没提这个?- 我的解决办法是把4096换成参数
n。不检查n的话也是可能会发生堆溢出的。
- 我的解决办法是把4096换成参数
最终修改后的test.c如下:
#include <linux/init.h>
#include <linux/module.h>
#include <linux/proc_fs.h>
#include <linux/uaccess.h>
#include <linux/slab.h>

#define MY_DEV_NAME "test"
#define DEBUG_FLAG "PROC_DEV"

static ssize_t proc_read (struct file *proc_file, char __user *proc_user, size_t n, loff_t *loff);
static ssize_t proc_write (struct file *proc_file, const char __user *proc_user, size_t n, loff_t *loff);
static int proc_open (struct inode *proc_inode, struct file *proc_file);
static struct proc_ops a = { // [1]file_operations -> proc_ops
                                .proc_open = proc_open, // [2] .open -> .proc_open
                                .proc_read = proc_read, // [3] .read -> .proc_read
                                .proc_write = proc_write, //[4] .write -> .proc_write
};


static int __init mod_init(void)
{
    struct proc_dir_entry *test_entry;
    // const struct file_operations *proc_fops = &a; // [5] 注释
    const struct proc_ops *proc_fops = &a; // [6] 添加这行
    printk(DEBUG_FLAG":proc init start!\n");

    test_entry = proc_create(MY_DEV_NAME, S_IRUGO|S_IWUGO, NULL, proc_fops);
    if(!test_entry)
       printk(DEBUG_FLAG":there is somethings wrong!\n");

    printk(DEBUG_FLAG":proc init over!\n");
    return 0;
}
......
static ssize_t proc_write (struct file *proc_file, const char __user *proc_user, size_t n, loff_t *loff)
{
    char *c = kmalloc(512, GFP_KERNEL);

    copy_from_user(c, proc_user, n); // 4096 -> n
    printk(DEBUG_FLAG":into write!\n");
    return 0;
}
......
module_init(mod_init);
Makefile修改这一行:
EXTRA_CFLAGS += -fno-stack-protector -no-pie -Wno-error=unused-result -Wno-error=error
如果想要连warning都不显示,可以加上编译选项:
KBUILD_CFLAGS += -w
最后再次make,成功生成test.ko:
ztree@ubuntu2:~/fuzz/kernel/test$ make
make -C /home/ztree/fuzz/kernel/test/6.4.0/build M=/home/ztree/fuzz/kernel/test modules
make[1]: Entering directory '/home/ztree/fuzz/kernel/linux'
  CC [M]  /home/ztree/fuzz/kernel/test/test.o
/home/ztree/fuzz/kernel/test/test.c: In function ‘proc_write’:
/home/ztree/fuzz/kernel/test/test.c:47:5: warning: ignoring return value of ‘copy_from_user’ declared with attribute ‘warn_unused_result’ [-Wunused-result]
   47 |     copy_from_user(c, proc_user, n);
      |     ^~~~~~~~~~~~~~~~~~~~~~~~~~~~~~~
  MODPOST /home/ztree/fuzz/kernel/test/Module.symvers
  LD [M]  /home/ztree/fuzz/kernel/test/test.ko
make[1]: Leaving directory '/home/ztree/fuzz/kernel/linux'

ztree@ubuntu2:~/fuzz/kernel/test$ ls
6.4.0  Makefile  Makefile.bak  modules.order  Module.symvers  test.c  test.ko  test.mod  test.mod.c  test.mod.o  test.o
接下来,把test.c 拷贝到/linux/drivers/char/下,然后vim /linux/drivers/char/Kconfig
ztree@ubuntu2:~/fuzz/kernel/test$ cp test.c ../linux/drivers/char/
ztree@ubuntu2:~/fuzz/kernel/test$ vim ../linux/drivers/char/Kconfig
添加如下内容:
# SPDX-License-Identifier: GPL-2.0
#
# Character device configuration
#

menu "Character devices"

source "drivers/tty/Kconfig"

config TEST_MODULE                                  #### 添加开始
        tristate "Heap Overflow Test"
        default y
        help
          This file is to test a buffer overflow.   #### 添加结束

config TTY_PRINTK
在char目录下的Makefile末尾添加:
ztree@ubuntu2:~/fuzz/kernel/linux$ vim drivers/char/Makefile
EXTRA_CFLAGS += -Wno-error=unused-result
obj-$(CONFIG_TEST_MODULE)       += test.o
然后重新编译内核,可以看到确实是编译了:
ztree@ubuntu2:~/fuzz/kernel/test$ cd ../linux
ztree@ubuntu2:~/fuzz/kernel/linux$ make -j16
......
  CC      drivers/char/test.o
drivers/char/test.c: In function ‘proc_write’:
drivers/char/test.c:47:5: warning: ignoring return value of ‘copy_from_user’ declared with attribute ‘warn_unused_result’ [-Wunused-result]
   47 |     copy_from_user(c, proc_user, n);
      |     ^~~~~~~~~~~~~~~~~~~~~~~~~~~~~~~
......
使用新编译好的内核镜像启动qemu,进去看看是否ok:
root@syzkaller:~# ls /proc/test
/proc/test
Nice!继续!
2.9.2 添加syzkaller规则
进入gopath/github.com/google/syzkaller/sys/linux/目录,新建proc_operation.txt:
include <linux/fs.h>

open$proc(file ptr[in, string["/proc/test"]], flags flags[proc_open_flags], mode flags[proc_open_mode]) fd
read$proc(fd fd, buf buffer[out], count len[buf])
write$proc(fd fd, buf buffer[in], count len[buf])
close$proc(fd fd)

proc_open_flags = O_RDONLY, O_WRONLY, O_RDWR, O_APPEND, FASYNC, O_CLOEXEC, O_CREAT, O_DIRECT, O_DIRECTORY, O_EXCL, O_LARGEFILE, O_NOATIME, O_NOCTTY, O_NOFOLLOW, O_NONBLOCK, O_PATH, O_SYNC, O_TRUNC, __O_TMPFILE
proc_open_mode = S_IRUSR, S_IWUSR, S_IXUSR, S_IRGRP, S_IWGRP, S_IXGRP, S_IROTH, S_IWOTH, S_IXOTH
open$proc等$号前的syscallname是系统调用名,$号后的type是指特定类型的系统调用。- proc类型的open系统调用
- 这个名字是由规则编写者确定的,具体行为靠的是后面的参数去确定。
file ptr[in, string["/proc/test"]]等ArgumentName ArgumentType[Limit]- ArgumentName是指参数名
- ArgumentType指的是参数类型,例如上述例子有string、flags等类型。
[Limit]就是具体的参数的值,不指定的时候由syzkaller自动生成,若要指定须在后文指定。- 比如
proc_open_flags和proc_open_mode就在后面指定了值。
- 比如
因为例子是通过/proc/test这个内核接口的写操作来触发堆溢出,因此我们需要控制的参数是open函数中的file参数为/proc/test即可,其他操作参考sys.txt。
2.9.3 确认编译了syz-extract和syz-sysgen
# 之前只编译了 syz-sysgen
ztree@ubuntu2:~/fuzz/kernel/gopath/github.com/google/syzkaller$ ls bin
linux_amd64  linux_arm64  syz-db  syz-manager  syz-mutate  syz-prog2c  syz-repro  syz-runtest  syz-sysgen  syz-upgrade  vm.log

# 编译syz-extract
ztree@ubuntu2:~/fuzz/kernel/gopath/github.com/google/syzkaller$ make bin/syz-extract
GOOS=linux GOARCH=amd64 go build "-ldflags=-s -w -X github.com/google/syzkaller/prog.GitRevision=6a383ecfb767c80c9fa63c7708b25e568a4ebfec -X 'github.com/google/syzkaller/prog.gitRevisionDate=2021032

ztree@ubuntu2:~/fuzz/kernel/gopath/github.com/google/syzkaller$ ls bin
linux_amd64  linux_arm64  syz-db  syz-extract  syz-manager  syz-mutate  syz-prog2c  syz-repro  syz-runtest  syz-sysgen  syz-upgrade  vm.log
2.9.4 使用 syz-extract 生成 .const 文件
ztree@ubuntu2:~/fuzz/kernel/gopath/github.com/google/syzkaller$ bin/syz-extract -os linux -sourcedir "/home/ztree/fuzz/kernel/linux" -arch amd64 proc_operation.txt
generating linux/amd64...

# 生成const文件
ztree@ubuntu2:~/fuzz/kernel/gopath/github.com/google/syzkaller$ find . -name "proc_operation.txt.const"
./sys/linux/proc_operation.txt.const

# 查看该const文件
ztree@ubuntu2:~/fuzz/kernel/gopath/github.com/google/syzkaller$ cat sys/linux/proc_operation.txt.const
# Code generated by syz-sysgen. DO NOT EDIT.
arches = amd64
FASYNC = amd64:8192
O_APPEND = amd64:1024
O_CLOEXEC = amd64:524288
O_CREAT = amd64:64
O_DIRECT = amd64:16384
O_DIRECTORY = amd64:65536
O_EXCL = amd64:128
O_LARGEFILE = amd64:32768
O_NOATIME = amd64:262144
O_NOCTTY = amd64:256
O_NOFOLLOW = amd64:131072
O_NONBLOCK = amd64:2048
O_PATH = amd64:2097152
O_RDONLY = amd64:0
O_RDWR = amd64:2
O_SYNC = amd64:1052672
O_TRUNC = amd64:512
O_WRONLY = amd64:1
S_IRGRP = amd64:32
S_IROTH = amd64:4
S_IRUSR = amd64:256
S_IWGRP = amd64:16
S_IWOTH = amd64:2
S_IWUSR = amd64:128
S_IXGRP = amd64:8
S_IXOTH = amd64:1
S_IXUSR = amd64:64
__NR_close = amd64:3
__NR_open = amd64:2
__NR_read = amd64:0
__NR_write = amd64:1
__O_TMPFILE = amd64:4194304
2.9.5 运行syz-gen
ztree@ubuntu2:~/fuzz/kernel/gopath/github.com/google/syzkaller$ bin/syz-sysgen
2.9.6 重新编译syzkaller
ztree@ubuntu2:~/fuzz/kernel/gopath/github.com/google/syzkaller$ make clean
rm -rf ./bin .descriptions sys/*/gen executor/defs.h executor/syscalls.h
ztree@ubuntu2:~/fuzz/kernel/gopath/github.com/google/syzkaller$ make all
2.9.7 修改test.cfg
ztree@ubuntu2:~/fuzz/kernel/gopath/github.com/google/syzkaller$ vim /home/ztree/fuzz/kernel/syzkaller-workdir/test.cfg
添加enable_syscalls:
{
        "target": "linux/amd64",
        "http": "127.0.0.1:56741",
        "workdir": "/home/ztree/fuzz/kernel/syzkaller-workdir",
        "kernel_obj": "/home/ztree/fuzz/kernel/linux",
        "image": "/home/ztree/fuzz/kernel/linux/image/bullseye.img",
        "sshkey": "/home/ztree/fuzz/kernel/linux/image/bullseye.id_rsa",
        "syzkaller": "/home/ztree/fuzz/kernel/gopath/github.com/google/syzkaller",
        "procs": 8,
        "type": "qemu",
        "enable_syscalls": [
            "open$proc",
            "read$proc",
            "write$proc",
            "close$proc"
        ],
        "vm": {
                "count": 4,
                "kernel": "/home/ztree/fuzz/kernel/linux/arch/x86/boot/bzImage",
                "cpu": 2,
                "mem": 2048,
                "cmdline": "net.ifnames=0",
                "qemu_args":"-enable-kvm"
        }
}
2.9.8 fuzz 驱动test
ztree@ubuntu2:~/fuzz/kernel/gopath/github.com/google/syzkaller$ bin/syz-manager -config=/home/ztree/fuzz/kernel/syzkaller-workdir/test.cfg
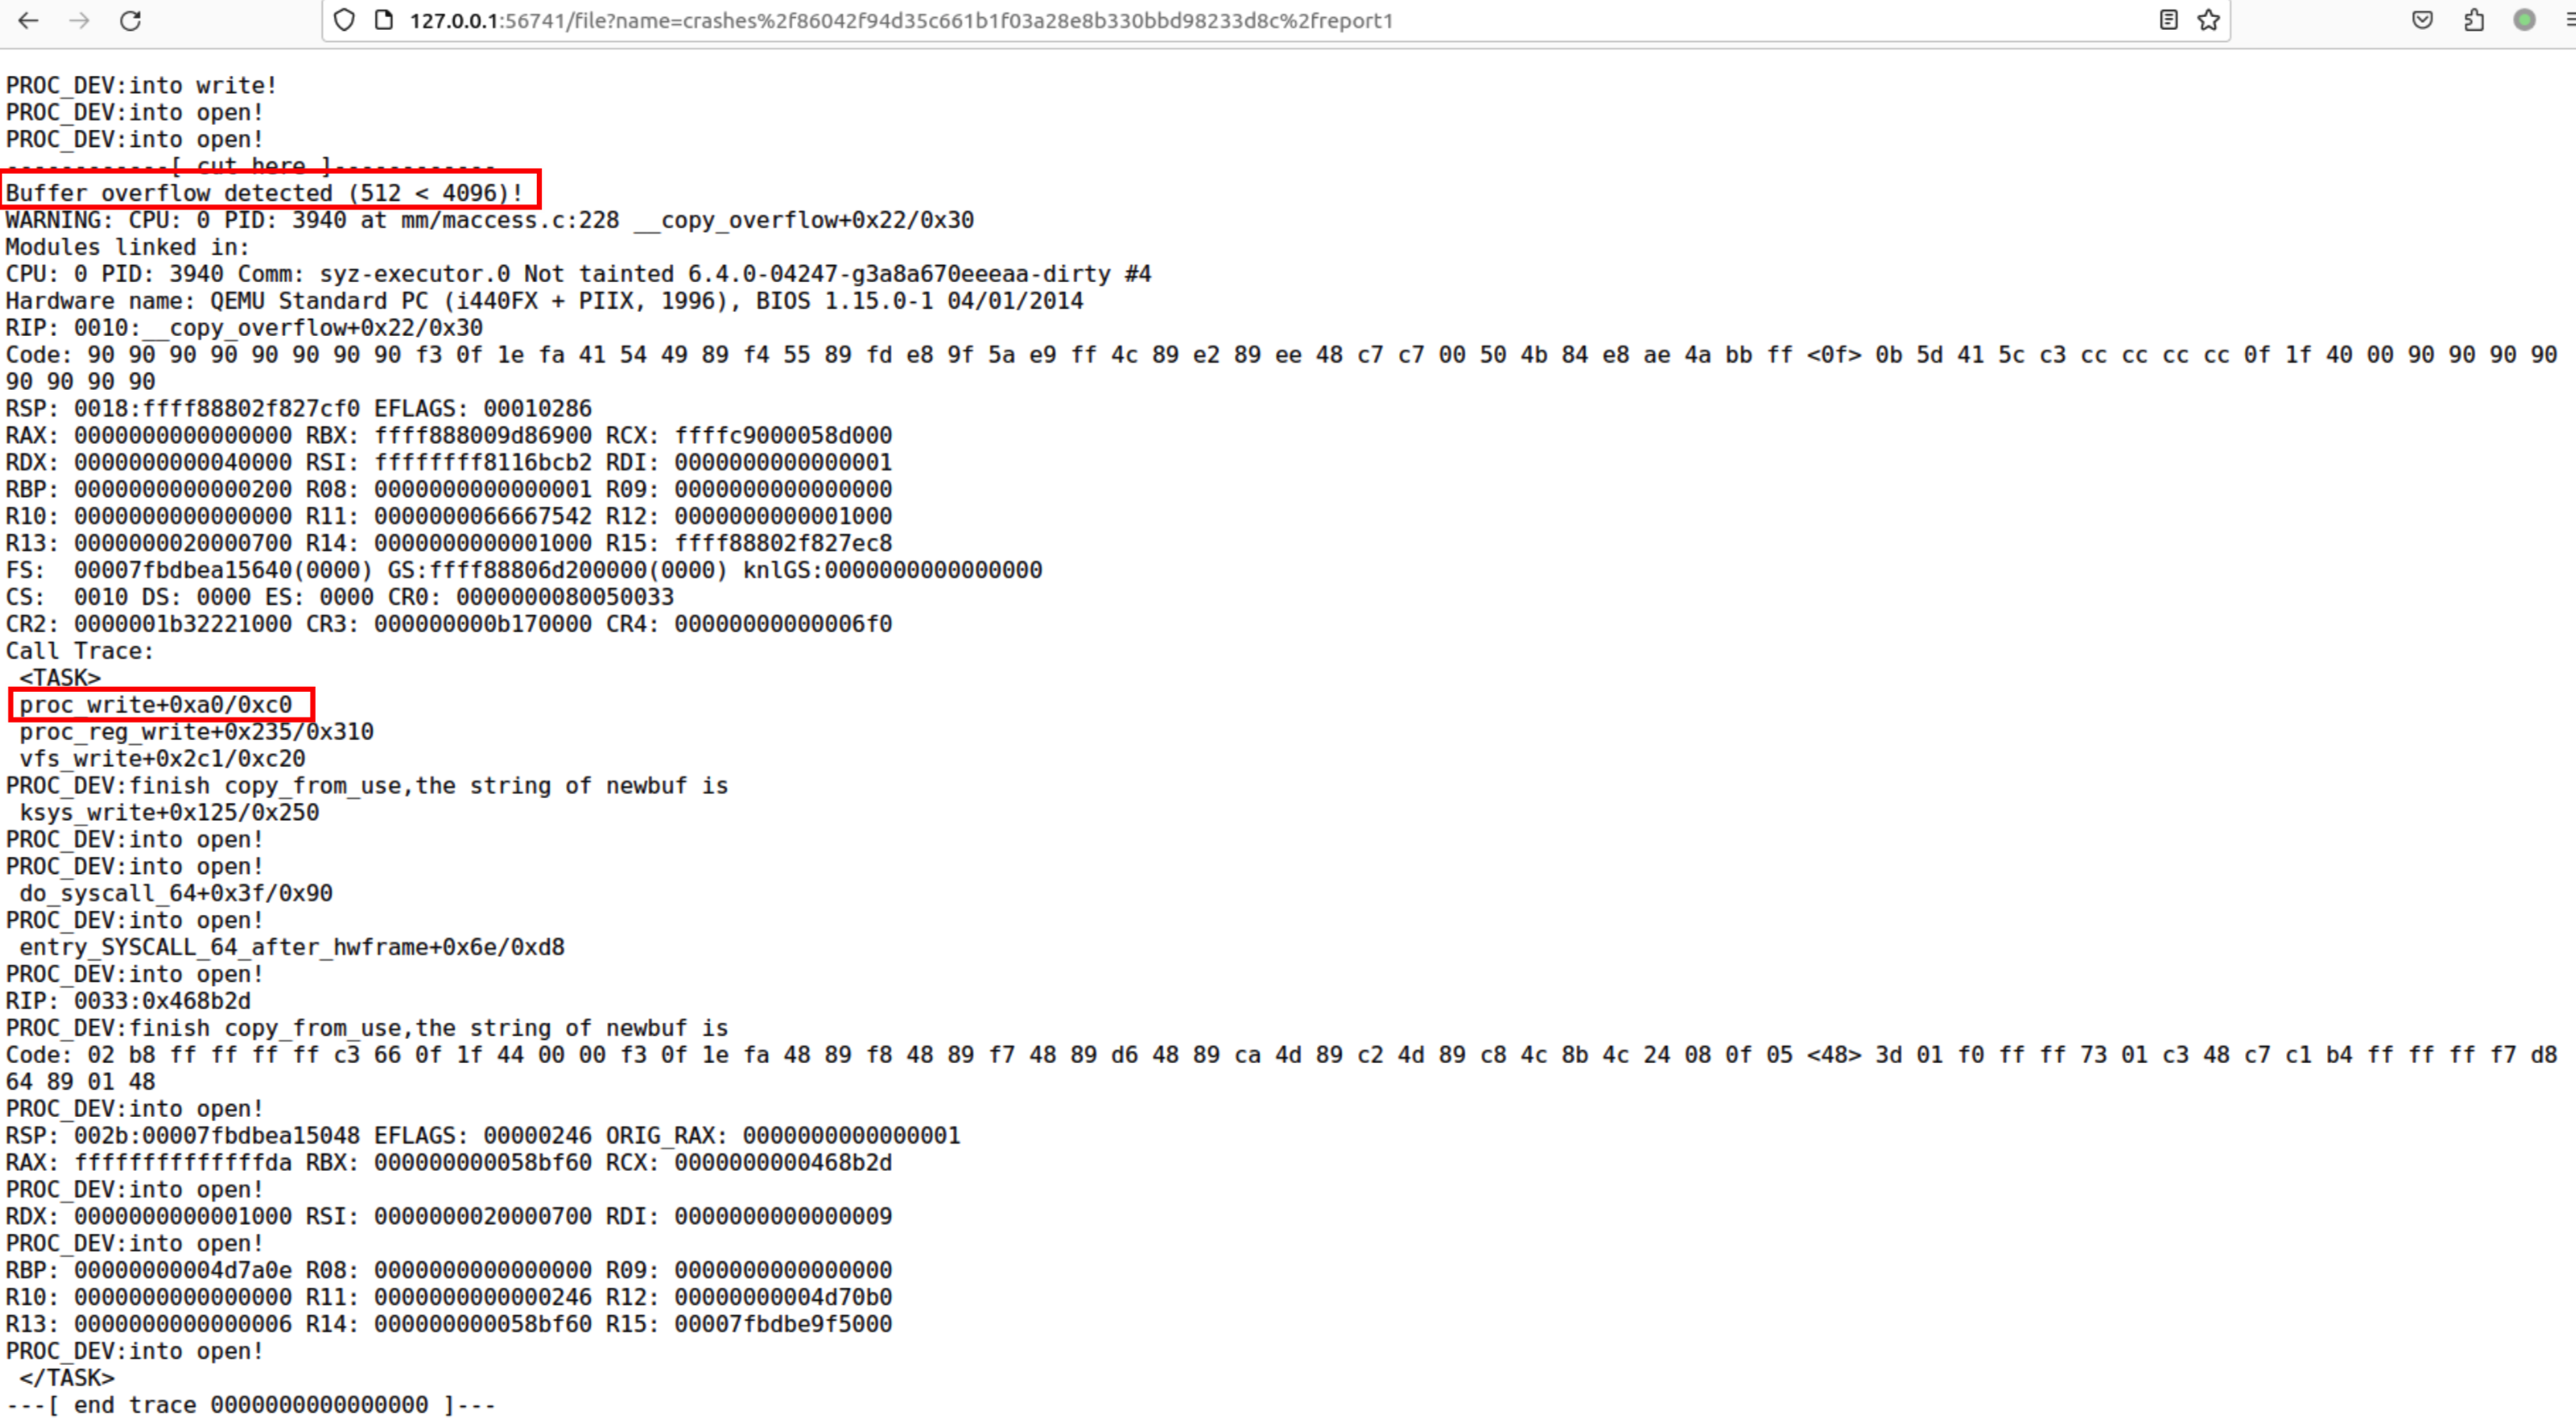
不一会,跑出3个crash:
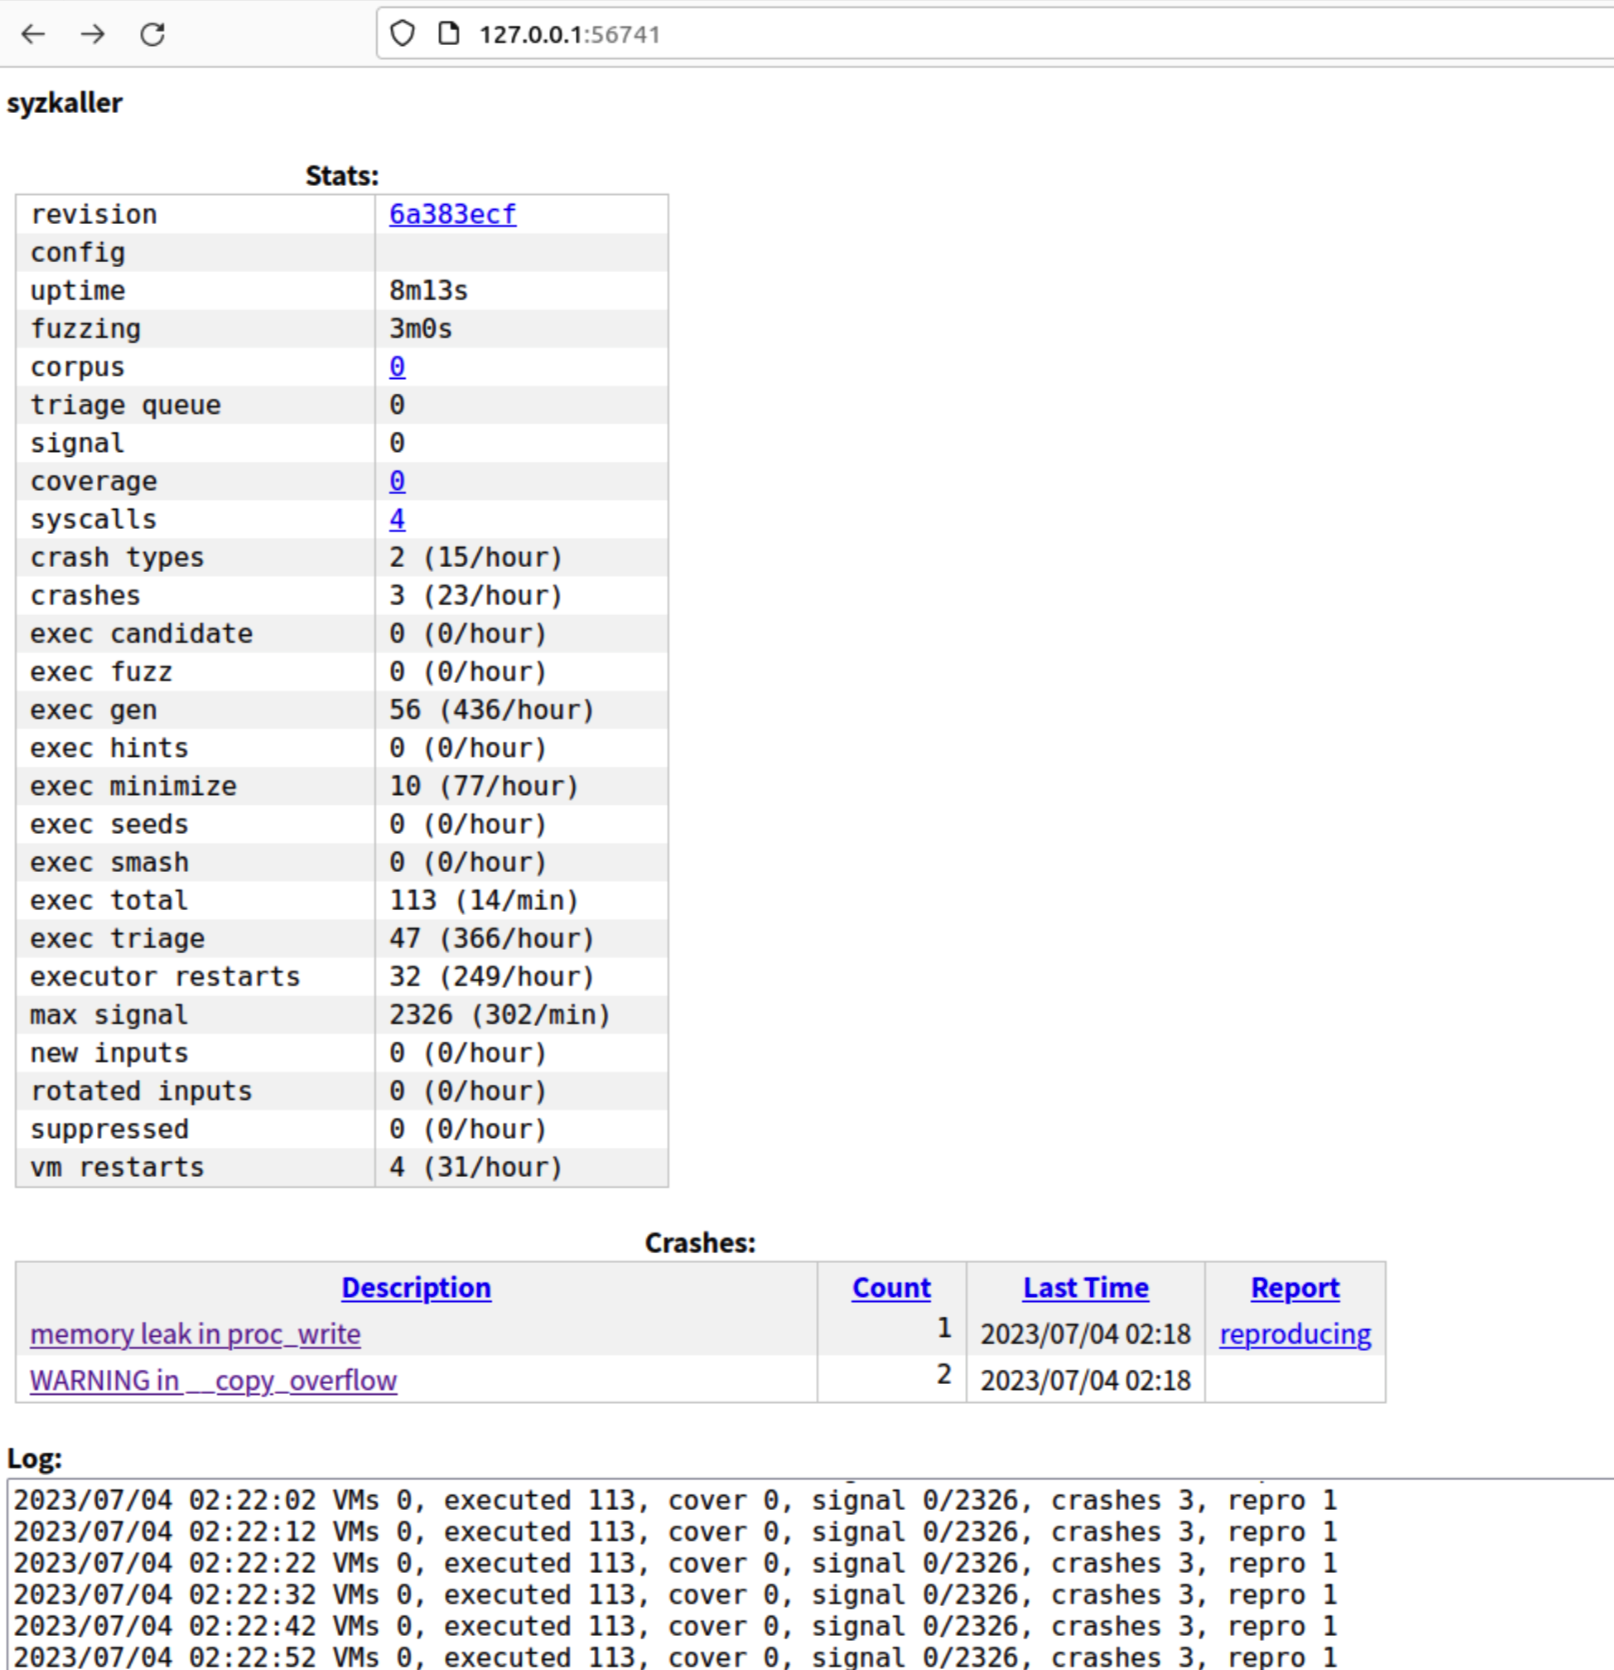
查看copy_overflow:
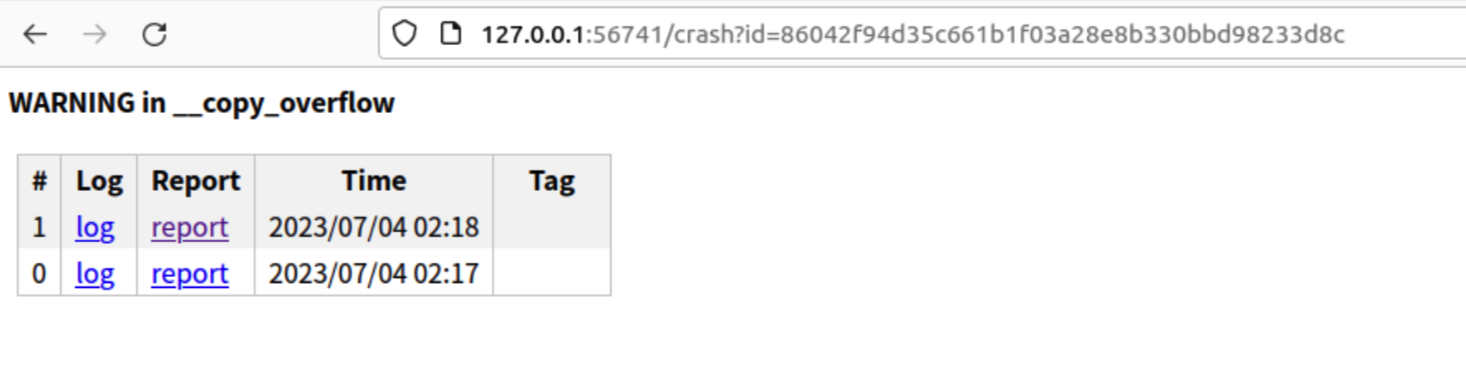
Call Trace定位到proc_write。Nice!
参考文献
- https://www.freebuf.com/vuls/322630.html
- http://pwn4.fun/2019/10/29/Syzkaller-Fuzz-Android-Kernel/
- http://www.gandalf.site/2019/02/syzkallerfuzz-android-kernel.html
- https://www.cnblogs.com/m00nflower/p/16474927.html
- https://blog.senyuuri.info/posts/2020-04-16-fuzzing-a-pixel-3a-kernel-with-syzkaller/
- https://github.com/google/syzkaller/blob/master/docs/linux/troubleshooting.md
- https://github.com/google/syzkaller/blob/master/docs/linux/setup_linux-host_android-device_arm-kernel.md