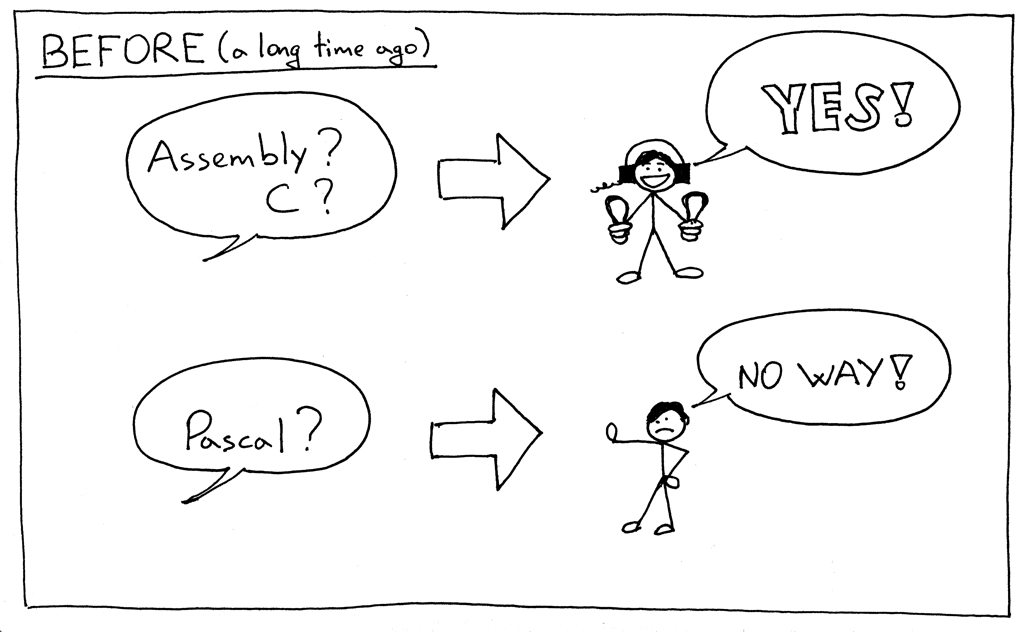
I remember when I was in university (a long time ago) and learning systems programming, I believed that the only “real” languages were Assembly and C. And Pascal was - how to put it nicely - a very high-level language used by application developers who didn’t want to know what was going on under the hood.
我记得当我在大学学习系统编程的时候(很久以前) ,我相信唯一“真正”的语言是汇编语言和 c 语言,而 Pascal 语言——怎么说好听点——是一种非常高级的语言,被那些不想知道背后发生了什么的应用程序开发人员所使用。
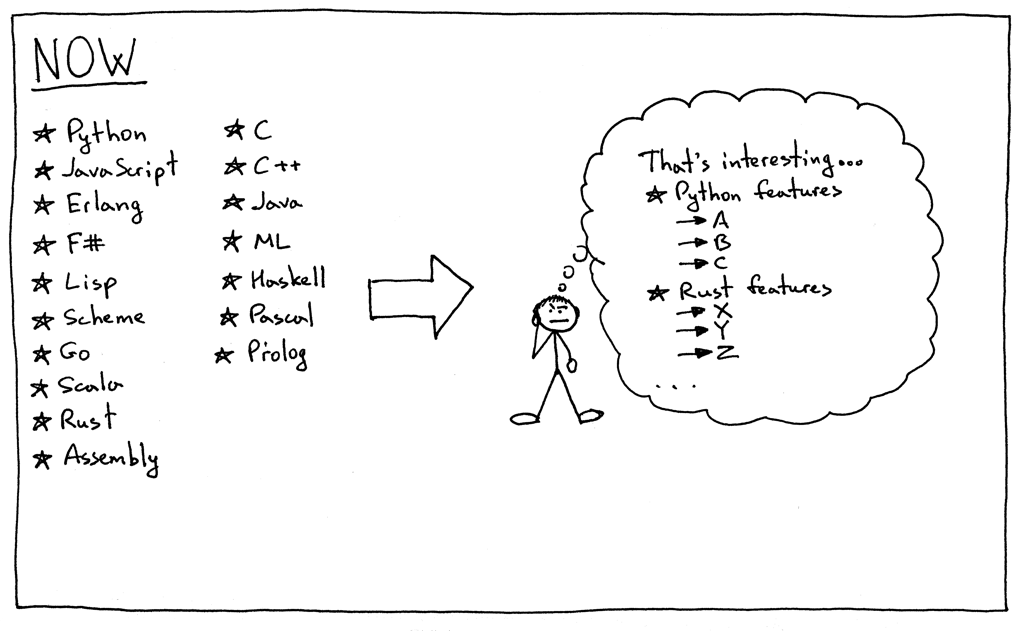
Little did I know back then that I would be writing almost everything in Python (and love every bit of it) to pay my bills and that I would also be writing an interpreter and compiler for Pascal for the reasons I stated in the very first article of the series.
当时我并不知道,为了支付账单(???),我几乎要用 Python 写所有的东西(并且喜欢它的每一点) ,而且我还要为 Pascal 编写一个解释器和编译器,原因我在本系列的第一篇文章中就提到过。
These days, I consider myself a programming languages enthusiast, and I’m fascinated by all languages and their unique features. Having said that, I have to note that I enjoy using certain languages way more than others. I am biased and I’ll be the first one to admit that. 😃
这些天,我认为自己是一个编程语言爱好者,我着迷于所有的语言和它们的独特功能。话虽如此,我必须指出,我比其他人更喜欢使用某些语言。我是有偏见的,我将是第一个承认这一点的人。😃
This is me before:
这是我以前的样子:
And now:
现在:
Okay, let’s get down to business. Here is what you’re going to learn today:
好了,让我们言归正传。以下是你今天要学习的内容:
- How to parse and interpret a Pascal program definition. 如何解析和解释 Pascal 程序定义
- How to parse and interpret compound statements. 如何解析和解释复合语句
- How to parse and interpret assignment statements, including variables. 如何解析和解释赋值语句,包括变量
- A bit about symbol tables and how to store and lookup variables. 关于符号表以及如何存储和查找变量
I’ll use the following sample Pascal-like program to introduce new concepts:
我将使用下面这个类似 pascal 的程序来介绍一些新的概念:
BEGIN
    BEGIN
        number := 2;
        a := number;
        b := 10 * a + 10 * number / 4;
        c := a - - b
    END;
    x := 11;
END.
You could say that that’s quite a jump from the command line interpreter you wrote so far by following the previous articles in the series, but it’s a jump that I hope will bring excitement. It’s not “just” a calculator anymore, we’re getting serious here, Pascal serious. 😃
可以说,这与您在本系列前几篇文章之后编写的命令行解释器相比,是一个相当大的跳转,但我希望这是一个将带来令人兴奋的结果的跳转。它不再只是一个“计算器”,我们在这里变得严肃认真,Pascal 认真。😃
Let’s dive in and look at syntax diagrams for new language constructs and their corresponding grammar rules.
让我们深入研究一下新语言结构的语法图及其相应的语法规则。
On your marks: Ready. Set. Go!
各就各位: 预备,开始!
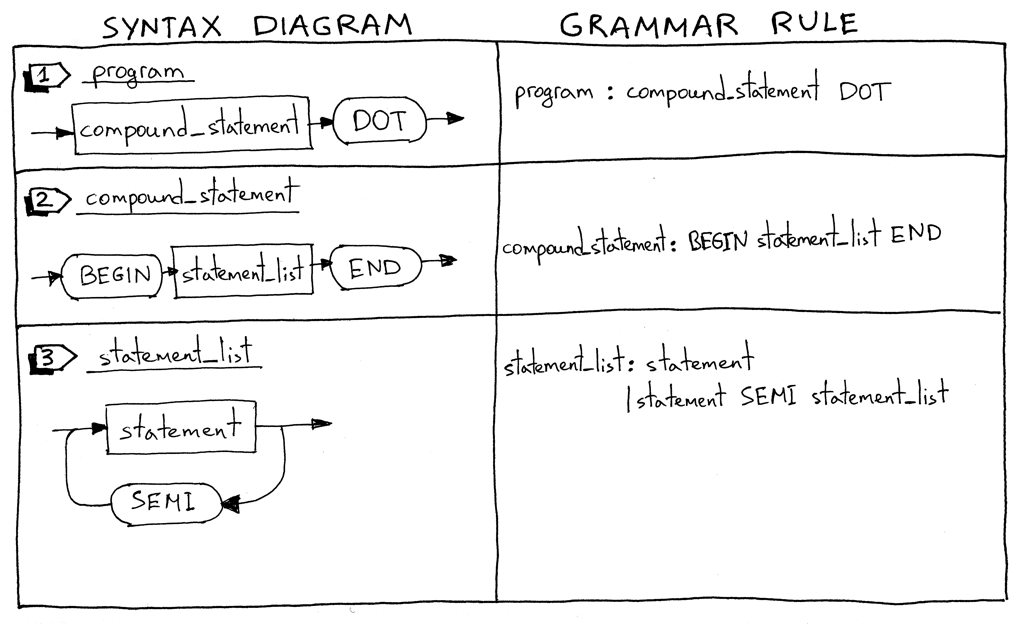
- I’ll start with describing what a Pascal program is. A Pascal program consists of a compound statement that ends with a dot. Here is an example of a program:
我将从描述什么是 Pascal 程序开始。Pascal 程序由一个以点结尾的复合语句组成。下面是一个程序的例子:
“BEGIN END.”
I have to note that this is not a complete program definition, and we’ll extend it later in the series.
我必须指出,这并不是一个完整的程序定义,我们将在本系列后面对其进行扩展。
- What is a compound statement? A compound statement is a block marked with BEGIN and END that can contain a list (possibly empty) of statements including other compound statements. Every statement inside the compound statement, except for the last one, must terminate with a semicolon. The last statement in the block may or may not have a terminating semicolon. Here are some examples of valid compound statements:
什么是复合语句?复合语句是标记为 BEGIN 和 END 的块,它可以包含包含其他复合语句的语句列表(可能为空)。除了最后一个语句之外,复合语句中的所有语句都必须以分号结束。块中的最后一个语句可能有也可能没有终止分号。下面是一些有效的复合语句的例子:
“BEGIN END”
“BEGIN a := 5; x := 11 END”
“BEGIN a := 5; x := 11; END”
“BEGIN BEGIN a := 5 END; x := 11 END”
-
A statement list is a list of zero or more statements inside a compound statement. See above for some examples.
语句列表是复合语句中包含零个或多个语句的列表。 -
A statement can be a compound statement, an assignment statement, or it can be an empty statement.
语句可以是复合语句、赋值语句,也可以是空语句。 -
An assignment statement is a variable followed by an ASSIGN token (two characters, ‘:’ and ‘=’) followed by an expression.
赋值语句是一个变量,后跟一个 ASSIGN 标记(两个字符,‘ :’和‘ =’) ,然后是一个表达式。
“a := 11”
“b := a + 9 - 5 * 2”
- A variable is an identifier. We’ll use the ID token for variables. The value of the token will be a variable’s name like ‘a’, ‘number’, and so on. In the following code block ‘a’ and ‘b’ are variables:
变量是一个标识符。我们将对变量使用 ID 标记。token的value将是变量的名称,如‘ a’、‘ number’等等。在下面的代码块中 a 和 b 是变量:
“BEGIN a := 11; b := a + 9 - 5 * 2 END”
-
An empty statement represents a grammar rule with no further productions. We use the empty_statement grammar rule to indicate the end of the statement_list in the parser and also to allow for empty compound statements as in ‘BEGIN END’.
空语句表示没有进一步结果的语法规则。我们使用 empty _ statement 语法规则来指示语法分析器中 statement _ list 的结尾,并且允许使用空的复合语句,如‘ BEGIN END’。 -
The factor rule is updated to handle variables.
factor规则被更新以处理变量。
Now let’s take a look at our complete grammar:
现在让我们来看看完整的语法:
    program : compound_statement DOT

    compound_statement : BEGIN statement_list END

    statement_list : statement
                   | statement SEMI statement_list

    statement : compound_statement
              | assignment_statement
              | empty

    assignment_statement : variable ASSIGN expr

    empty :

    expr: term ((PLUS | MINUS) term)*

    term: factor ((MUL | DIV) factor)*

    factor : PLUS factor
           | MINUS factor
           | INTEGER
           | LPAREN expr RPAREN
           | variable

    variable: ID
You probably noticed that I didn’t use the star ‘*’ symbol in the compound_statement rule to represent zero or more repetitions, but instead explicitly specified the statement_list rule. This is another way to represent the ‘zero or more’ operation, and it will come in handy when we look at parser generators like PLY, later in the series. I also split the “(PLUS | MINUS) factor” sub-rule into two separate rules.
您可能已经注意到,在复合语句规则中,我没有使用星号‘ *’符号来表示零次或更多次的重复,而是明确指定了语句列表规则。这是表示“零或更多”操作的另一种方法,在本系列后面的文章中,当我们研究像 PLY 这样的解析器生成器时,它会派上用场。我还将(PLUS | MINUS) 这个factor 子规则分为两个独立的规则。
In order to support the updated grammar, we need to make a number of changes to our lexer, parser, and interpreter. Let’s go over those changes one by one.
为了支持更新后的语法,我们需要对词法分析器、语法分析器和解释器进行一些更改。让我们一个一个地复习一下这些变化。
Here is the summary of the changes in our lexer: 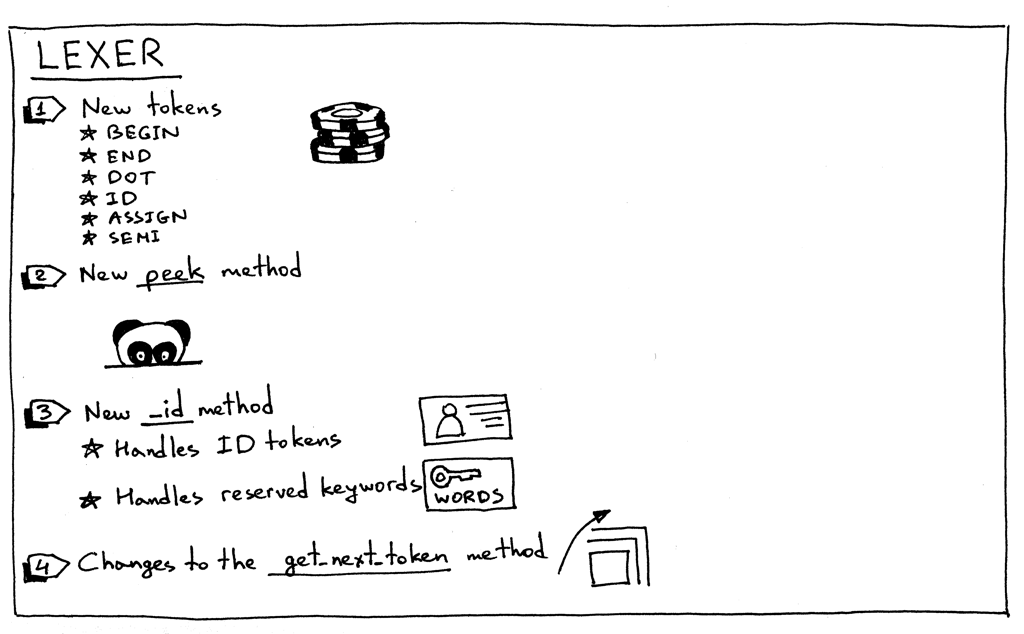
下面是 lexer 中的更改摘要:
- To support a Pascal program’s definition, compound statements, assignment statements, and variables, our lexer needs to return new tokens:
为了支持 Pascal 程序的定义、复合语句、赋值语句和变量,lexer 需要返回新的token:
- BEGIN (to mark the beginning of a compound statement)
- (标记复合语句的开头)
- END (to mark the end of the compound statement)
- (标记复合语句的结束)
- DOT (a token for a dot character ‘.’ required by a Pascal program’s definition)
- (Pascal 程序定义所要求的点字符“ .”的token)
- ASSIGN (a token for a two character sequence ‘:=’). In Pascal, an assignment operator is different than in many other languages like C, Python, Java, Rust, or Go, where you would use single character ‘=’ to indicate assignment
- (两个字符序列‘ : =’的token)。在 Pascal 中,赋值操作符不同于许多其他语言,如 c、 Python、 Java、 Rust 或 Go,在这些语言中,你可以使用单个字符‘ =’来表示赋值。
- SEMI (a token for a semicolon character ‘;’ that is used to mark the end of a statement inside a compound statement)
- (分号字符‘ ;’的token,用于标记复合语句中语句的结束)
- ID (A token for a valid identifier. Identifiers start with an alphabetical character followed by any number of alphanumerical characters)
- (表示有效标识符的token。标识符以字母字符开头,后跟任意数量的字母数字字符)
- Sometimes, in order to be able to differentiate between different tokens that start with the same character, (‘:’ vs ‘:=’ or ‘==’ vs ‘=>’ ) we need to peek into the input buffer without actually consuming the next character. For this particular purpose, I introduced a peek method that will help us tokenize assignment statements. The method is not strictly required, but I thought I would introduce it earlier in the series and it will also make the get_next_token method a bit cleaner. All it does is return the next character from the text buffer without incrementing the self.pos variable. Here is the method itself:
有时候,为了能够区分以相同字符开头的不同token(:vs:=或= =vs=>) ,我们需要查看输入缓冲区,而不需要实际消耗下一个字符。为此,我介绍了一个 peek 方法,它将帮助我们对赋值语句tokenize。这个方法并不是严格要求的,但是我认为我应该在本系列的前面介绍这个方法,它还将使 get_next _ token 方法更加清晰。它所做的只是从文本缓冲区返回下一个字符,而不增加 self.pos 变量。这就是方法本身:
def peek(self):
peek_pos = self.pos + 1
if peek_pos > len(self.text) - 1:
    return None
else:
    return self.text[peek_pos]
- Because Pascal variables and reserved keywords are both identifiers, we will combine their handling into one method called _id. The way it works is that the lexer consumes a sequence of alphanumerical characters and then checks if the character sequence is a reserved word. If it is, it returns a pre-constructed token for that reserved keyword. And if it’s not a reserved keyword, it returns a new ID token whose value is the character string (lexeme). I bet at this point you think, “Gosh, just show me the code.” 😃 Here it is:
因为 Pascal 变量和保留关键字都是标识符,所以我们将它们的处理合并到一个名为_id的方法中。它的工作方式是,词法分析器“消耗”一个字母数字字符序列,然后检查字符序列是否是保留字。如果是,则返回该保留关键字的预构造token。如果它不是保留关键字,则返回一个新的 ID token,其值为字符串(lexeme)。我打赌此时你会想,“天哪,给我看看代码吧。”:)在这里:
RESERVED_KEYWORDS = {
'BEGIN': Token('BEGIN', 'BEGIN'),
'END': Token('END', 'END'),
}
def _id(self):
 """Handle identifiers and reserved keywords"""
 result = ''
 while self.current_char is not None and self.current_char.isalnum():
 result += self.current_char
 self.advance()

 token = RESERVED_KEYWORDS.get(result, Token(ID, result))
 return token
- And now let’s take a look at the changes in the main lexer method get_next_token:
现在让我们来看看 lexer 方法 get _ next _ token 中的更改:
def get_next_token(self):
    while self.current_char is not None:
        ...
        if self.current_char.isalpha():
            return self._id()

        if self.current_char == ':' and self.peek() == '=':
            self.advance()
            self.advance()
            return Token(ASSIGN, ':=')

        if self.current_char == ';':
            self.advance()
            return Token(SEMI, ';')

        if self.current_char == '.':
            self.advance()
            return Token(DOT, '.')
        ...
It’s time to see our shiny new lexer in all its glory and action. Download the source code from GitHub and launch your Python shell from the same directory where you saved the spi.py file:
现在是时候看看我们新的 lexer 。从 GitHub 下载源代码,然后从保存 spi.py 文件的同一个目录启动 Python shell:
>>> from spi import Lexer
>>> lexer = Lexer('BEGIN a := 2; END.')
>>> lexer.get_next_token()
Token(BEGIN, 'BEGIN')
>>> lexer.get_next_token()
Token(ID, 'a')
>>> lexer.get_next_token()
Token(ASSIGN, ':=')
>>> lexer.get_next_token()
Token(INTEGER, 2)
>>> lexer.get_next_token()
Token(SEMI, ';')
>>> lexer.get_next_token()
Token(END, 'END')
>>> lexer.get_next_token()
Token(DOT, '.')
>>> lexer.get_next_token()
Token(EOF, None)
>>>
Moving on to parser changes.
继续更改解析器。
Here is the summary of changes in our parser: 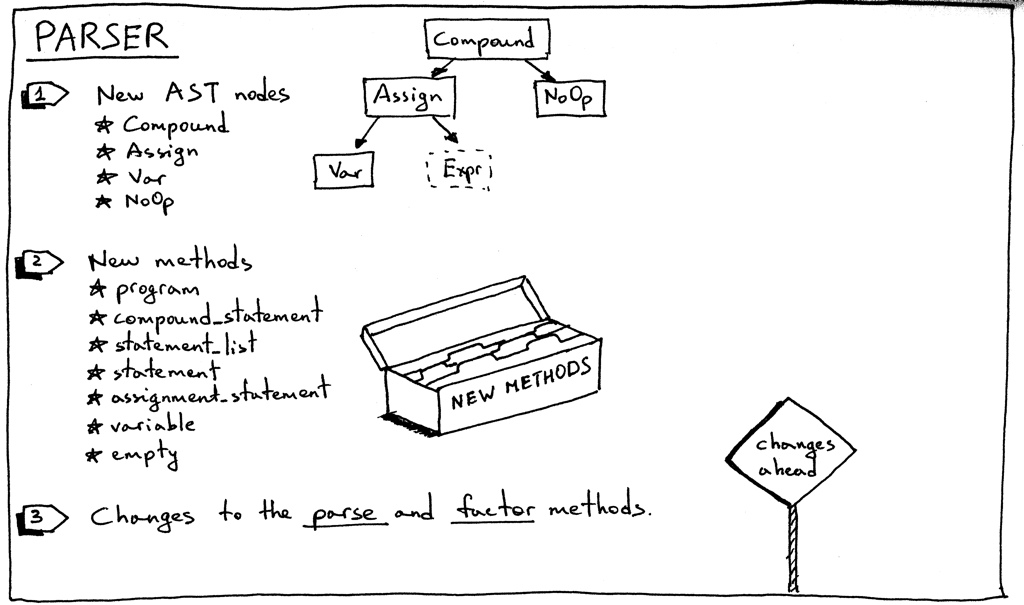
以下是我们解析器中的变化总结:
- Let’s start with new AST nodes:
让我们从新的 AST 节点开始:
-
Compound AST node represents a compound statement. It contains a list of statement nodes in its children variable.
Compound AST 节点表示一个复合语句,它的子变量中包含一个语句节点列表。class Compound(AST): """Represents a 'BEGIN ... END' block""" def __init__(self): self.children = [] -
Assign AST node represents an assignment statement. Its left variable is for storing a Var node and its right variable is for storing a node returned by the expr parser method:
Assign AST 节点表示一个赋值语句。它的左变量用于存储 Var 节点,右变量用于存储 expr 解析方法返回的节点:class Assign(AST): def __init__(self, left, op, right): self.left = left self.token = self.op = op self.right = right -
Var AST node (you guessed it) represents a variable. The self.value holds the variable’s name.
Var AST 节点(您猜对了)表示一个变量。class Var(AST): """The Var node is constructed out of ID token.""" def __init__(self, token): self.token = token self.value = token.value -
NoOp node is used to represent an empty statement. For example ‘BEGIN END’ is a valid compound statement that has no statements.
NoOp 节点用于表示一个空语句。例如,BEGIN END 是一个没有语句的有效复合语句。
- As you remember, each rule from the grammar has a corresponding method in our recursive-descent parser. This time we’re adding seven new methods. These methods are responsible for parsing new language constructs and constructing new AST nodes. They are pretty straightforward:
正如您所记得的,文法中的每个规则在我们的递归下降分析器中都有一个对应的方法。这次我们增加了七种新方法。这些方法负责解析新的语言结构并构造新的 AST 节点。它们非常直截了当:
def program(self):
  """program : compound_statement DOT"""
  node = self.compound_statement()
  self.eat(DOT)
  return node

def compound_statement(self):
  """
  compound_statement: BEGIN statement_list END
  """
  self.eat(BEGIN)
  nodes = self.statement_list()
  self.eat(END)

  root = Compound()
  for node in nodes:
      root.children.append(node)

  return root

def statement_list(self):
  """
  statement_list : statement
                 | statement SEMI statement_list
  """
  node = self.statement()

  results = [node]

  while self.current_token.type == SEMI:
      self.eat(SEMI)
      results.append(self.statement())

  if self.current_token.type == ID:
      self.error()

  return results

def statement(self):
  """
  statement : compound_statement
            | assignment_statement
            | empty
  """
  if self.current_token.type == BEGIN:
      node = self.compound_statement()
  elif self.current_token.type == ID:
      node = self.assignment_statement()
  else:
      node = self.empty()
  return node

def assignment_statement(self):
  """
  assignment_statement : variable ASSIGN expr
  """
  left = self.variable()
  token = self.current_token
  self.eat(ASSIGN)
  right = self.expr()
  node = Assign(left, token, right)
  return node

def variable(self):
  """
  variable : ID
  """
  node = Var(self.current_token)
  self.eat(ID)
  return node

def empty(self):
  """An empty production"""
  return NoOp()
- We also need to update the existing factor method to parse variables:
我们还需要更新现有的 factor 方法来解析变量:
def factor(self):
    """factor : PLUS  factor
              | MINUS factor
              | INTEGER
              | LPAREN expr RPAREN
              | variable
    """
    token = self.current_token
    if token.type == PLUS:
        self.eat(PLUS)
        node = UnaryOp(token, self.factor())
        return node
    ...
    else:
        node = self.variable()
        return node
- The parser’s parse method is updated to start the parsing process by parsing a program definition:
解析器的 parse 方法通过解析程序定义来更新开始解析过程:
def parse(self):
    node = self.program()
    if self.current_token.type != EOF:
        self.error()

    return node
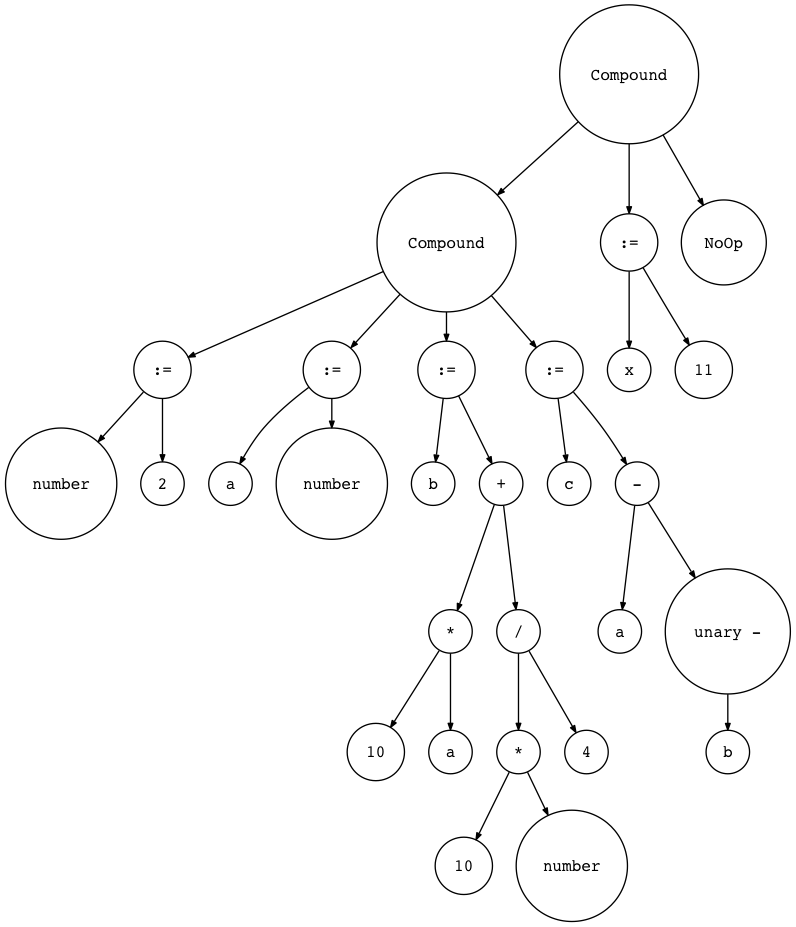
Here is our sample program again:
下面是我们的示例程序:
BEGIN
    BEGIN
        number := 2;
        a := number;
        b := 10 * a + 10 * number / 4;
        c := a - - b
    END;
    x := 11;
END.
Let’s visualize it with genastdot.py (For brevity, when displaying a Var node, it just shows the node’s variable name and when displaying an Assign node it shows ‘:=’ instead of showing ‘Assign’ text):
让我们使用 genastdot.py 将其可视化(为了简便起见,在显示 Var 节点时,它只显示节点的变量名,而在显示 Assign 节点时,它显示‘ : =’而不显示‘ Assign’文本) :
$ python genastdot.py assignments.txt > ast.dot && dot -Tpng -o ast.png ast.dot
And finally, here are the required interpreter changes: 
最后,以下是所需的解释器更改:
To interpret new AST nodes, we need to add corresponding visitor methods to the interpreter. There are four new visitor methods:
要解释新的 AST 节点,我们需要向解释器添加相应的visitor方法。有四种新的访问方法:
- visit_Compound
- visit_Assign
- visit_Var
- visit_NoOp
Compound and NoOp visitor methods are pretty straightforward. The visit_Compound method iterates over its children and visits each one in turn, and the visit_NoOp method does nothing.
Compound 和 NoOp 访问者方法非常简单。 _visit_Compound _方法迭代它的子元素并依次访问每个子元素,而_visit_NoOp_方法什么也不做。
def visit_Compound(self, node):
    for child in node.children:
        self.visit(child)

def visit_NoOp(self, node):
    pass
The Assign and Var visitor methods deserve a closer examination.
Assign 和 Var visitor 方法值得进一步研究。
When we assign a value to a variable, we need to store that value somewhere for when we need it later, and that’s exactly what the visit_Assign method does:
当我们为一个变量赋值时,我们需要将这个值存储在某个地方,以备以后需要时使用,而这正是 visit _ assign 方法所做的:
def visit_Assign(self, node):
    var_name = node.left.value
    self.GLOBAL_SCOPE[var_name] = self.visit(node.right)
The method stores a key-value pair (a variable name and a value associated with the variable) in a symbol table GLOBAL_SCOPE. What is a symbol table? A symbol table is an abstract data type (ADT) for tracking various symbols in source code. The only symbol category we have right now is variables and we use the Python dictionary to implement the symbol table ADT. For now I’ll just say that the way the symbol table is used in this article is pretty “hacky”: it’s not a separate class with special methods but a simple Python dictionary and it also does double duty as a memory space. In future articles, I will be talking about symbol tables in much greater detail, and together we’ll also remove all the hacks.
该方法在符号表 global_scope 中存储键值对(变量名和与变量关联的值)。什么是符号表?符号表是用于跟踪源代码中各种符号的抽象数据类型(ADT)。我们现在唯一的符号类别是变量,我们使用 Python 字典来实现符号表 ADT。现在我只想说,本文中使用符号表的方式非常“朴素”: 它不是一个带有特殊方法的单独类,而是一个简单的 Python 字典,它还兼有作为内存空间的双重任务。在以后的文章中,我将更详细地讨论符号表,我们还将一起删除所有的hacks。
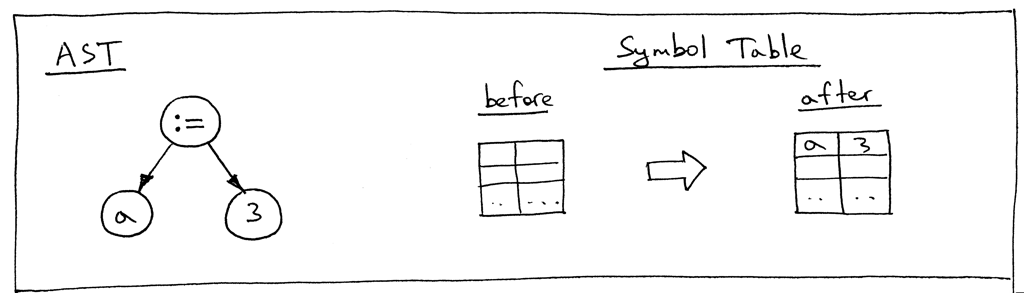
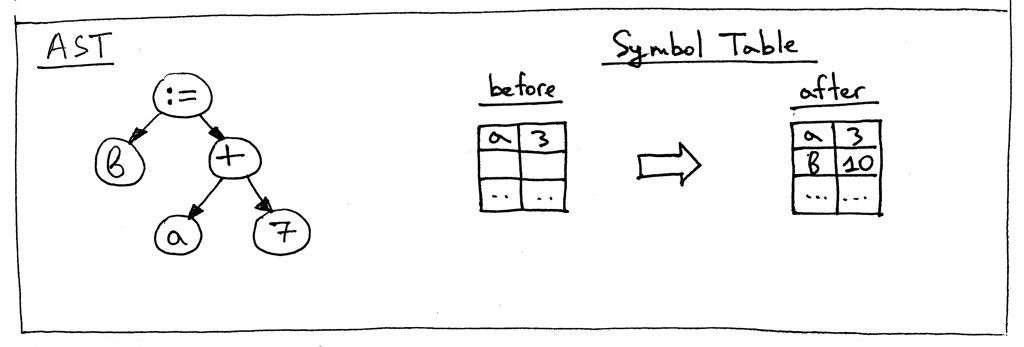
Let’s take a look at an AST for the statement “a := 3;” and the symbol table before and after the visit_Assign method does its job:
让我们看一下语句“ a: = 3;”的 AST,并且在 visit _ assign 方法之前和之后的符号表完成了它的工作:
Now let’s take a look at an AST for the statement “b := a + 7;”
现在让我们看一下语句“ b: = a + 7;”的 AST
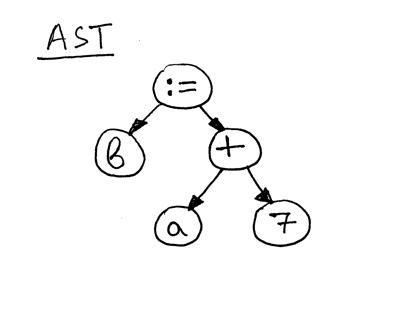
As you can see, the right-hand side of the assignment statement - “a + 7” - references the variable ‘a’, so before we can evaluate the expression “a + 7” we need to find out what the value of ‘a’ is and that’s the responsibility of the visit_Var method:
正如你所看到的,赋值语句的右边——“ a + 7”——引用了变量“ a”,所以在我们计算表达式“ a + 7”之前,我们需要找出“ a”的值,这是 visit _ var 方法的职责:
def visit_Var(self, node):
    var_name = node.value
    val = self.GLOBAL_SCOPE.get(var_name)
    if val is None:
        raise NameError(repr(var_name))
    else:
        return val
When the method visits a Var node as in the above AST picture, it first gets the variable’s name and then uses that name as a key into the GLOBAL_SCOPE dictionary to get the variable’s value. If it can find the value, it returns it, if not - it raises a NameError exception. Here are the contents of the symbol table before evaluating the assignment statement “b := a + 7;”:
当该方法访问上面 AST 图片中的 Var 节点时,它首先获取变量的名称,然后使用该名称作为 GLOBAL _ scope 字典中的键来获取变量的值。如果它能找到该值,则返回该值,如果不能,则引发 NameError 异常。下面是在计算赋值语句“ b: = a + 7;”之前的符号表的内容:
These are all the changes that we need to do today to make our interpreter tick. At the end of the main program, we simply print the contents of the symbol table GLOBAL_SCOPE to standard output.
这些就是我们今天需要做的所有改变,以使我们的解释器工作起来。在主程序的最后,我们简单地将符号表 GLOBAL _ scope 的内容打印到标准输出。
Let’s take our updated interpreter for a drive both from a Python interactive shell and from the command line. Make sure that you downloaded both the source code for the interpreter and the assignments.txt file before testing:
让我们从 Python 交互式 shell 和命令行获取已更新的解释器驱动器。在测试之前,确保你下载了解释器的源代码和 assignments.txt 文件:
Launch your Python shell:
启动你的 Python shell:
$ python
>>> from spi import Lexer, Parser, Interpreter
>>> text = """\
... BEGIN
...
...     BEGIN
...         number := 2;
...         a := number;
...         b := 10 * a + 10 * number / 4;
...         c := a - - b
...     END;
...
...     x := 11;
... END.
... """
>>> lexer = Lexer(text)
>>> parser = Parser(lexer)
>>> interpreter = Interpreter(parser)
>>> interpreter.interpret()
>>> print(interpreter.GLOBAL_SCOPE)
{'a': 2, 'x': 11, 'c': 27, 'b': 25, 'number': 2}
And from the command line, using a source file as input to our interpreter:
在命令行中,使用源文件作为解释器的输入:
$ python spi.py assignments.txt
{'a': 2, 'x': 11, 'c': 27, 'b': 25, 'number': 2}
If you haven’t tried it yet, try it now and see for yourself that the interpreter is doing its job properly.
如果你还没有尝试过,那么现在就试一试,看看译员是否正确地完成了它的工作。
Let’s sum up what you had to do to extend the Pascal interpreter in this article:
让我们总结一下在本文中扩展 Pascal 解释器所做的工作:
- Add new rules to the grammar
- 在grammar中添加新规则
- Add new tokens and supporting methods to the lexer and update the _get_next_token _method
- 向 lexer 添加新的token和支持方法,并更新_get_next_token_方法
- Add new nodes to the parser for new language constructs 为新语言结构添加新的node到解析器
- Add new methods corresponding to the new grammar rules to our recursive-descent parser and update any existing methods, if necessary (factor method, I’m looking at you. 😃
- 向递归下降解析器中添加与新语法规则对应的新方法,并在必要时更新任何现有方法
- Add new visitor methods to the interpreter 向解释器添加新的visitor方法
- Add a dictionary for storing variables and for looking them up 添加一个用于存储变量和查找变量的字典
In this part I had to introduce a number of “hacks” that we’ll remove as we move forward with the series:
在这一部分中,我必须介绍一些“ hacks”,我们将在本系列后续文章中删除它们:
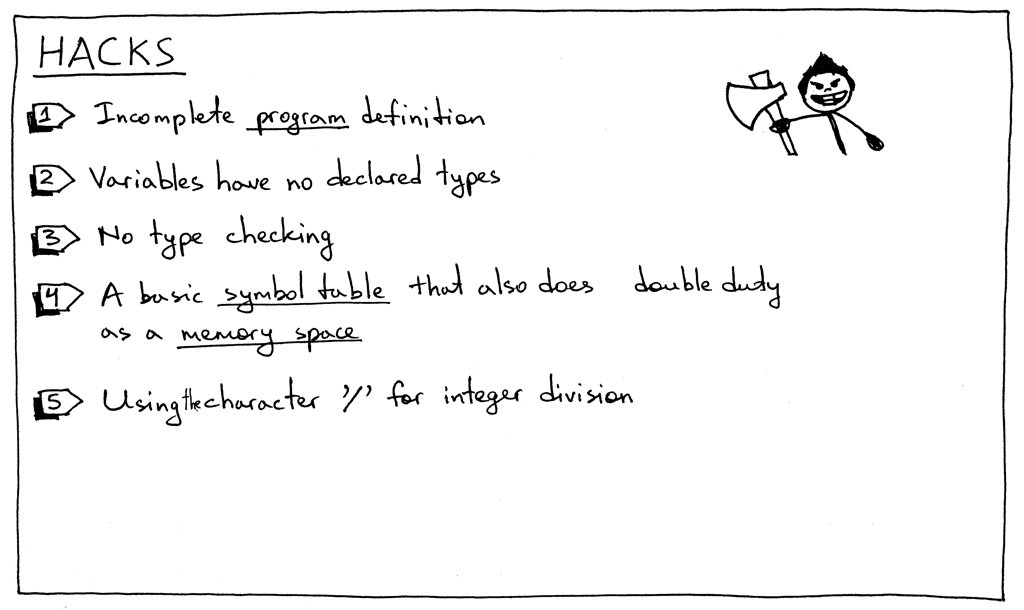
- The _program _grammar rule is incomplete. We’ll extend it later with additional elements.
- program的语法规则是不完整的。我们稍后将使用其他元素对其进行扩展
- Pascal is a statically typed language, and you must declare a variable and its type before using it. But, as you saw, that was not the case in this article.
- Pascal 是一种静态类型语言,在使用它之前必须声明变量及其类型。但是,正如你所看到的,这篇文章并不是这样的
- No type checking so far. It’s not a big deal at this point, but I just wanted to mention it explicitly. Once we add more types to our interpreter we’ll need to report an error when you try to add a string and an integer, for example.
- 到目前为止还没有类型检查。在这一点上,这不是什么大问题,但我只是想明确地提一下。一旦我们向解释器添加了更多的类型,我们就需要在尝试添加字符串和整数时报告一个错误
- A symbol table in this part is a simple Python dictionary that does double duty as a memory space. Worry not: symbol tables are such an important topic that I’ll have several articles dedicated just to them. And memory space (runtime management) is a topic of its own.
- 本部分中的符号表是一个简单的 Python 字典,它兼有内存空间的双重任务。不用担心: 符号表是一个非常重要的主题,我将专门为它们写几篇文章。内存空间(运行时管理)是一个单独的话题
- In our simple calculator from previous articles, we used a forward slash character ‘/’ for denoting integer division. In Pascal, though, you have to use a keyword _div _ to specify integer division (See Exercise 1).
- 在前面文章中的简单计算器中,我们使用了斜杠字符‘/’来表示整数除法。但在 Pascal 语言中,你必须使用关键词 div 来指定整数除法(请参阅练习1)。
- There is also one hack that I introduced on purpose so that you could fix it in Exercise 2: in Pascal all reserved keywords and identifiers are case insensitive, but the interpreter in this article treats them as case sensitive.
- 我还故意介绍了一个hack,这样你就可以在练习2中修正它: 在 Pascal 语言中,所有保留的关键字和标识符都不区分大小写,但是本文中的解释器将它们视为区分大小写
To keep you fit, here are new exercises for you:
练习:

-
Pascal variables and reserved keywords are case insensitive, unlike in many other programming languages, so BEGIN, begin, and BeGin they all refer to the same reserved keyword. Update the interpreter so that variables and reserved keywords are case insensitive. Use the following program to test it:
-
与许多其他编程语言不同,Pascal 变量和保留关键字不区分大小写,因此 BEGIN、 BEGIN 和 BEGIN 都引用同一个保留关键字。更新解释器,使变量和保留关键字不区分大小写。使用以下程序进行测试:
BEGIN
    BEGIN
        number := 2;
        a := NumBer;
        B := 10 * a + 10 * NUMBER / 4;
        c := a - - b
    end;

    x := 11;
END.
-
I mentioned in the “hacks” section before that our interpreter is using the forward slash character ‘/’ to denote integer division, but instead it should be using Pascal’s reserved keyword div for integer division. Update the interpreter to use the div keyword for integer division, thus eliminating one of the hacks.
-
我在前面的“ hacks”部分提到过,我们的解释器使用正斜杠字符‘/’来表示整数除法,但是它应该使用 Pascal 的保留关键字 div 来表示整数除法。更新解释器,使其使用 div 关键字进行整数除法,从而消除一个 hacks。
- Update the interpreter so that variables could also start with an underscore as in ‘_num := 5’.
更新解释器,使得变量也可以以_num := 5中的下划线开头。
That’s all for today. Stay tuned and see you soon.
今天就到这里,敬请期待。
Here is a list of books I recommend that will help you in your study of interpreters and compilers:
以下是我推荐的一些书籍,它们可以帮助你学习解释器和编译器:
- Language Implementation Patterns: Create Your Own Domain-Specific and General Programming Languages (Pragmatic Programmers)
语言实现模式: 创建您自己的特定领域和通用编程语言(实用程序员) - Compilers: Principles, Techniques, and Tools (2nd Edition)
编译器: 原理、技术和工具(第二版)
If you want to get my newest articles in your inbox, then enter your email address below and click "Get Updates!"
如果你想得到我的最新文章在您的收件箱,然后输入您的电子邮件地址下面,并点击“获取更新!”
All articles in this series:
本系列的所有文章:
- Let's Build A Simple Interpreter. Part 1. 让我们构建一个简单的解释器
- Let's Build A Simple Interpreter. Part 2. 让我们构建一个简单的解释器
- Let's Build A Simple Interpreter. Part 3. 让我们构建一个简单的解释器
- Let's Build A Simple Interpreter. Part 4. 让我们构建一个简单的解释器
- Let's Build A Simple Interpreter. Part 5. 让我们构建一个简单的解释器
- Let's Build A Simple Interpreter. Part 6. 让我们构建一个简单的解释器
- Let's Build A Simple Interpreter. Part 7: Abstract Syntax Trees 让我们构建一个简单的解释器。第7部分: 抽象语法树
- Let's Build A Simple Interpreter. Part 8. 让我们构建一个简单的解释器
- Let's Build A Simple Interpreter. Part 9. 让我们构建一个简单的解释器
- Let's Build A Simple Interpreter. Part 10. 让我们构建一个简单的解释器
- Let's Build A Simple Interpreter. Part 11. 让我们构建一个简单的解释器
- Let's Build A Simple Interpreter. Part 12. 让我们构建一个简单的解释器
- Let's Build A Simple Interpreter. Part 13: Semantic Analysis 让我们建立一个简单的解释器。第13部分: 语义分析
- Let's Build A Simple Interpreter. Part 14: Nested Scopes and a Source-to-Source Compiler 让我们构建一个简单的解释器。第14部分: 嵌套作用域和源到源编译器
- Let's Build A Simple Interpreter. Part 15. 让我们构建一个简单的解释器。第15部分
- Let's Build A Simple Interpreter. Part 16: Recognizing Procedure Calls 让我们建立一个简单的解释器。第16部分: 识别过程调用
- Let's Build A Simple Interpreter. Part 17: Call Stack and Activation Records 让我们构建一个简单的解释器。第17部分: 调用堆栈和激活记录
- Let's Build A Simple Interpreter. Part 18: Executing Procedure Calls 让我们构建一个简单的解释器。第18部分: 执行过程调用
- Let's Build A Simple Interpreter. Part 19: Nested Procedure Calls 让我们构建一个简单的解释器。第19部分: 嵌套过程调用